Learn to Knit Your First Cap

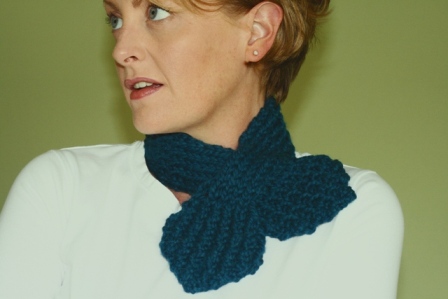
So, you’ve knit a scarf or two, what now? Time to “move beyond the rectangle” and start knitting shapes!
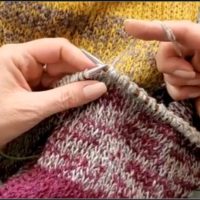
This project is designed for knitters who are comfortable with the basics – casting-on, knitting, and purling. In this tutorial we learn the next steps – knitting in-the-round, working ribbing, working with double-pointed needles, and working decreases.
Pattern includes three sizes – Child, Adult Small, and Adult Large.
This pattern includes links to four instructional videos to guide you through the new techniques you’ll learn.
Materials Needed:
• one skein of Lion Brand Wool-Ease Worsted (widely available at craft stores), or any worsted-weight yarn
• size 7 US 16″ circular needles
• size 7 US double-pointed needles
• a tapestry needle for weaving in your ends
This pattern is available two ways – either in traditional PDF (printable) format, or in eBook format.
Pattern + links to 4 instructional videos in PDF format $8.00 US via PayPal.![]()
Amazon eBook digital download (suitable for devices that use Kindle or another eReader; including iPad, iPhone, Android, Blackberry, and your computer): $6.00 US. 


Hello Staci,
You have a great website and your videos are not only very easy to understand and well structured but also quite entertaining.
I was wondering if there is a pattern and/or video for the nice blue cable cardigan you are wearing on this video (learn to knit your first cap)?
Thanks much for your help,
Anna
Comment by Anna — April 7, 2011 @ 5:32 pm
i am always amazed at how easy you make knitting seam. You are a great teacher and the videos are great!
Comment by Julia Bateman — April 7, 2011 @ 7:48 pm
oops play on words, I meant seem! LOL
Comment by Julia Bateman — April 7, 2011 @ 7:49 pm
Hi Anna – the sweater I’m wearing in this video is called Central Park Hoodie. It’s a great pattern, and fun to knit!
S t a c i
Comment by s t a c i — April 8, 2011 @ 10:03 am
Thank you, Julia!
Comment by s t a c i — April 8, 2011 @ 10:03 am
wow it is amazing how you can teach me so well!! thank you
Comment by kim brockway — June 30, 2012 @ 5:35 pm
Love your site, patterns & videos! I am knitting this cap from your pattern, & realized I made a few mistakes a few rows back. I know how to rip out a garter stitch but this rib stitch is terrifying me. Can you please give me some tips on how to rip back without losing my sanity?
Thanks so much!
Peggy
Comment by Peggy Schaefer — August 24, 2012 @ 8:51 pm
Hi Peggy – thank you for the note. I’m afraid there are no secrets to ripping out ribbing…you just have to be quick and get the live stitches back on the needle. However, I can share a technique with you that may help you, especially if you use it before you make a mistake. They’re called Lifelines, and I know many people who slide them into their work every few inches, just to be safe: http://verypink.com/2010/03/30/lifelines/
Good luck!
S t a c i
Comment by s t a c i — August 25, 2012 @ 7:16 am
i am very glad that i found your website and can learn from here
Comment by lisa — August 31, 2012 @ 9:24 pm
thank you so much im 12 and i still understand how to do it and what your talking about thank love ya
Comment by victoria — October 11, 2012 @ 9:31 am
I am making a striped scarf in stockinette stitch & it is curling bad. will it lay flat when I block it? What can I do I hate to rip the whole thing out after I’m half way done. Thank you
Comment by shelva Moats — November 5, 2012 @ 10:07 am
Thank you for your information I will try the pattern you sugested.
Comment by Shelva — November 5, 2012 @ 11:34 am
Hello Staci I am so glad for your sight I got the pattern you sugested & started it right away I really like it & it is so easy.
Thanks again
Comment by Shelva — November 6, 2012 @ 2:01 pm
Staci THANKS so much for ALL you do ! It’s been YEARS since I learned to knit ( I was 8…so that’s 51 yrs ago ! ) It’s been 40 yrs since I have knitted anything, so it’s like a new hobby once more !
MY QUESTION to you is this. I recently have been making your knitted dishcloths. However I have noticed that when looking at the dishcloth, the “YO’s ) ( the holes in the dishcloth ) look slightly BIGGER on one side of the knitted dishcloth than the other.
Is this wrong, or will this become LESS NOTICEABLE when I blocck the dishcloths ?
I am making 1-2 dishcloths for every gal on my Christmas list…..
THanks in advance for your HELP !
Jacqueline
Comment by Jacqueline — November 13, 2012 @ 5:49 am
Jaqueline – yes, the yarn-overs in the dishcloth will start to look better after blocking (or just using, in the case of a dishcloth). Chances are that you are working your yarn-overs with different tensions in the two halves of the dishcloth.
Thank you for the note!

S t a c i
Comment by s t a c i — November 13, 2012 @ 7:35 am
I just finished my first hat! Thank you. It looks adorable on my daughter who’s my best customer, and so forgiving. By to the scarf, for my husband this time. The videos are a great support to the patterns. Thank you again.
Comment by Claire — December 7, 2012 @ 8:43 pm
Love this pattern and the hat! I need to increase the size somewhat. I have 4 sons and they all need at least 24.5″ to 25.75″ (yes, I know…they have big heads) and was wondering what increment of stitches I can increase by to get the size I need.
Thanks!
Peggy
Comment by Peggy Schaefer — December 28, 2012 @ 4:07 pm
Thank you for all your lessons. I’ve wanted to advance beyond the basics for a long time but I haven’t known where to turn for help. Very pink.com is my new favorite site. My question: I trying this hat but every time I “join” my circle with stitches there is a long gap between the two sometimes over a half inch length of yarn. I have tried so many times to reduce this that my yarn is getting frayed. What am I doing wrong?
Comment by Carol — January 25, 2013 @ 7:57 pm
Hi Carol – thank you for the note. Seeing a gap where you join in-the-round is very common for a newer knitter (or someone learning this technique). All you can do is your best, and keep practicing. After you’ve finished knitting the hat, you can easily go back and tighten that gap up when you weave in the end hanging there. Problem solved!
Another thing you can do is to knit with a wool or wool blend. Wool is a very easy fiber to work with, and much more forgiving than other fibers when it comes to tension issues.
Good luck!
S t a c i
Comment by s t a c i — January 26, 2013 @ 8:40 am
Your website and videos are a not only breath of fresh air amidst a busy, stressful, exhausting typical week, but also a nice way to feel connected to my home country, being an ex-pat who greatly misses the states. Your energy and passion for knitting is utterly inspiring even for a novice knitter like myself:-). Thank you for all the dedication and charisma you put into your site–it really is appreciated around the world!
I couldn’t help noticing the beautiful shawl in the background of the cap video–do you have a pattern/tutorial available for it?
Cheers from a fan in Norway:-)
Comment by Carrie — February 22, 2013 @ 6:24 pm
I am taking help from your tutorials, while I was watching Beanie Hat tutorial, I wanted to know is there any proportion on the decreasing stitches keeping in mind the actual stitches. In one of your Beanie Hat tutorials you mentioned, In 1st row k8 k2g, k8 k2g then other row k7 k2g, in 3rd Row k6 k2g, and so on………
but in other tutorial you started decreasing like k5 k2g, in 2nd Row k4 k2g and so on, then in 3rd Row k3, k2tog
give me an idea if we have 200, 100, 50 actual stitches, please explain how we start decreasing of 200, 150, 50 so the crown shape will be perfect. Or just explain the decreasing concept.
Thank you for your help.
Comment by Mujahid Mahmood — February 27, 2013 @ 9:26 am