Here is my video on actually making the buttonholes.
Information on things you’ll see in this video:
The sweater I’m wearing is my Ombre Dyed Sweater, pattern + video tutorial.
The baby sweater I use to demonstrate is my Striped Cardi and Beanie/Beret pattern and video tutorial.
The “clippie markers” I use can be found here.
The sweater on the mannequin is hard to see, but it’s the Central Park Hoodie (not my pattern).
The nail color I’m wearing is by OPI, called “Nein! Nein! Nein! OK, Fine!”
My watch ring is made by Davis.


Hello,
I love your videos and they are very helpful too. I was wandering if you have videos on your technique of knitting. I really like the was you cast on and knit and purl you stitches. I am new to knitting and have been trying to get help on my technique. I look forward to hearing from you soon.
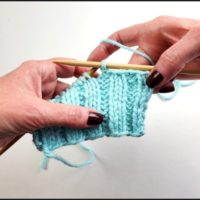
Hi Patricia – yes, the way I knit is called “flicking”. Here’s a video demonstrating it:
https://verypink.com/2011/03/02/flicking/
S t a c i
On women’s sweaters, I always found it most helpful to begin with placing the first button across the exact middle of the person’s bustline, where the stress of moving or twisting will create a gap in the cardigan when it’s closed. (In sewing the same principle is used.)
Then from there, the top button is placed and the button count in between those two is figured out; from there you just place the rest to the bottom button the same distance apart.
I make lots of baby/children’s sweaters and do not always want to make the commitment of boy/girl sweater until I know who will be wearing it. SO, I make button holes on “both” sides using a similar top/bottom/count style. BUT I put the button on top of a button hole once I determine boy or girl. This also allows changes if a sweater is passed down. Love the blog and tutorials….just found it today and already have so many ideas…yikes!
Jill
That is a great idea Jilly! I haven’t made a sweater yet but you can bet I will use your tip. Staci is all around awesome. My knitting took on a whole new dimension when I found her on YouTube.