To get your Arabella Shawl kit (over 30 colorways available, worldwide shipping), visit the SKEINO website.
The free pattern is available on Ravelry, and the video tutorial is below and also here on YouTube.
Frequently Asked Questions
1. Can you provide us with the written instructions for the way you work wraps and turns? (These instructions are also in the free pattern.)
– knit up to the stitch to be wrapped
– pull the working yarn forward between the two needles
– slip stitch from left needle to right
– pull the working yarn back between the two needles
– slip same stitch from right needle to left
– turn work
– pull the working yarn back between needles to be in position to continue knitting
2. Can I use German Short Rows instead of regular wraps and turns?
Yes, you can use GSRs, but there really isn’t any reason to. The awesome thing about GSRs is that they eliminate the need to pick up the wraps, which can be difficult in traditional wraps and turns. But this pattern is in garter stitch (knitting every row), and picking up the wraps is not necessary. If you prefer to use GSRs you certainly can, they won’t hurt anything in the pattern.
3. When I start the second triangle, do I knit 150 (like the pattern says) or 170?
You can trust the pattern – at the end of the first row in the new color, you cast-on 20. Knitting 150 is correct – it will not reach the end of the row, and it will make each triangle the same size, and give you the “staggered” effect I demonstrate in the video. 150 is divisible by 6.
Information on things you’ll see in this video:
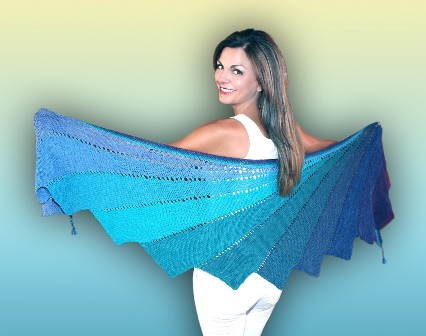
The colorway I used in my shawl is Clematis.
The colorway in the still photo is Aqua.
The bulky yarn I use for demonstration is Knit Picks Wool of the Andes Bulky, and the needles I used are Knitter’s Pride Platinas, from an interchangeable kit.
The plastic clippie markers I used can be found here.
The coil-less saftey pin markers can be found here.
My silver ring is actually a knitting needle gauge, and can be found here.
The nail polish I’m wearing is by Julep, and isn’t actually a color, but I like the way it looks. It’s a nail treatment, called Oxygen Nail Treatment. It seems to help my nails grow, and prevents chipping and peeling.


Staci:
I knit the first color and only have 15 feet of yarn left. You said in your tutorial it would take 19 feet to complete the border. I may take out the lace row, which will give me more yarn. (Thought that looked pretty. )
OR….I will have to start again and go down a needle size. What is your opinion? (I didn’t do a gauge; didn’t think I needed to. The yarn doesn’t seem to be quite enough.)
Loved loved loved the tutorial. But I’m sad and frustrated, it seems there is not enough yarn. I have restarted the shawl 4 times know thinking I may have done something wrong but by 3rd add on I run out of yarn an still have a ways to go. Now the yarn is looking bad from restarting and I’m also not going to have enough of the first 2 colors for the border. I am a fairly tight knitter so I’m not sure what I’m missing. Should I go to size 5 kindle instead of the 6? Wouldn’t that make the shawl smaller? Help! Please!
Guadalupe
Guadalupe – if you’re running out of yarn, your gauge (stitches per inch) must be very loose. Please check your gauge, and adjust your needle size smaller until it matches the gauge listed in the pattern.
S t a c i
Hi knitters,
Just wanted to let you know that we launched our 2016 collection of the Arabella Shawl today.
with 41 newly interpreted colorways this is the best Arabella Shawl ever.
As always you can find it only on SKEINO
Hi Staci, I finally ordered and received yarn from Skeino. Another project I would never attempt without your video. This is my first time with w&t’s. This is what I am confused about and want to make sure I have this right. After your first w&t you have 6 stitches left unworked, then 12, then 18, until you finish and then you have a gazillion stitches left you never did knit? Is this right so far? and if it is, are these the stitches you use to knit the boarder? Could this be right? I’m so confused. I hope you understand what I am saying.
Thank you!
Yes, you’ve got it right. All of the stitches are knit again in the Lace Row.
S t a c i
the arabella skeins are they connected or will there be ends to weave in?
Debbie – each color is it’s own hank of yarn, they are not connected.
S t a c i
Thumbs up and thank you Staci and Skeino! I decided to order the kit after watching your tutorial a couple of times and really liked the simplicity of the overall pattern which turns out a beautiful shawl that looks more complex than it is. This is my first time working with “luxury” yarn and won’t be my last, I’m already contemplating the next colorway I will order. I received the kit quickly and of course could hardly wait to get started and so far I am having a wonderful time working on it. I got to use my beloved ball winder and experienced pulling yarn from a hank for the first time too. I have only been working on it a short time and I am finishing the second color (the frequent color changes make it much more interesting), it appears I will have enough yarn left over for the edging. I am using the recommended needle size and I tend toward the tight side of knitting. I purchased the “Dahlia” colorway and will post the finished shawl on Ravelry of course giving credit to Skeino for their beautiful kits and to you for your fun teaching videos, if that is appropriate. I enjoy keeping track of my projects there and sharing the outcome with others. I admit that I like the surprise of seeing the color pattern as I add each new color without knowing what it will look like in the end but sometimes I just enjoy looking at the color combinations (I’m a Pinterest junkie too).
ok, probably silly question, but I am pretty new to knitting – are we working the triangle from 156 down to a final row of 6? I was chugging along until I read past row 8 and it said to “continue in this manner … the last w&t is 6 stitches from the end.” so literally we decease this same pattern 26 times and then work the lace row?
Thank you -you gave me enough confidence to try knitting I really love your videos.
Yvette
Yvette – no decreases, but you knit six fewer stitches every other row to make the triangles.
S t a c i
I wanted to leave a comment to encourage the use of lifelines especially for newer knitters. I foolishly thought since this was a simple pattern of mostly knitting that I wouldn’t have any problems, wrong! At the 6th color I noticed I had reloaded some stitches after my hands jerked trying to move the stitches along the needle (this happens often), of course I didn’t notice at the time when I could fix it without pulling back out. Thank fully I had your videos to refer to and successfully managed to insert a lifeline just below the mistake and pullout my stitches (gulp!) and correct the problem. I also forgot to cast on the 20 stitches on a prior row so I got a good lesson on going back to correct mistakes and using the lifeline to avoid the pain of trying to find the stitches. Picking up stitches in a regular knit 1 row, purl 1 row is a lot easier than picking up stitches in a knit all rows. Staci, would you consider a video tutorial on inserting a lifeline in a “knit all rows” pattern? I found I picked up the wrong stitches but was able to get back on track after some determination. Even though all the stitches look the same, they are not all created equal. Thanks so much for your help – Lisa Koehle