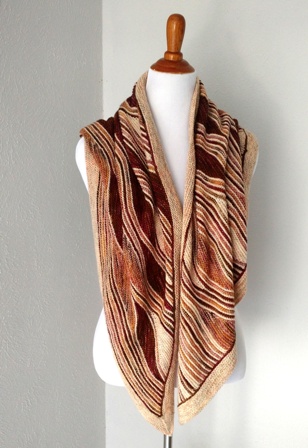
Tapestry Knitting is the exciting new technique used in the SKEINO Miss Grace Shawl, and I’m so excited to bring you this video tutorial explaining how to work the free Miss Grace pattern.
Skeino has removed this pattern from their website, but the Ravelry link to the free pattern is still active.
Time-coded Video Links:
Intro
Working Chart A
Working Chart B
Working the Border
Details and more photos of my Miss Grace can be found on my Ravelry project page. The colorway I chose for my shawl is “Sherri”, and the colorway of the yarn in the video is “Barb”.
I’ve done two other tutorials for SKEINO which can be found here:
Arabella
Scarf-in-a-Scarf
This blog post explains more about Tapestry Knitting, the technique used in this shawl.
To learn more about SKEINO and how they are collaborating with organizations that employ people with special needs in Germany and the US, visit this blog post.

Love this shawl. Ordered the yarn. Was wondering if a pattern comes with the yarn. I downloaded the free pattern and the print was very small. Had to adjust and it still is small. Thank you for all your tutorials!
Gay – yes, you will get a bit print of the pattern with your yarn kit. The easy way to print from the free download link is to print on tabloid sized (11 x 17″) paper. That way you can easily read the beautiful chart.
S t a c i
Where is the pattern. Do you have to buy the kit to get the pattern.
Thanks have knit projects from you website,Log Cabin Scrap Blanket, and bought your Dolman sweater pattern. You are one of the top teachers I can see on the web. Next would be good if you could show how to knit a simple tank top, showing the process to knit the neck and armholes.
Keep up the fabulous work.
Thank you for this tutorial. It gives me the confidence to try it, and have ordered the yarn. What needle lengths did you end up needing? If the finished edge is 41″, I suppose a 34″ circular would suffice, but then for the border, did you need a 60″? Did you use #4 throughout, or a bigger size to pickup the border stitches?
Caroline – the pattern link is provided in the blog post above: http://www.ravelry.com/patterns/library/miss-grace-shawl
Click the link and scroll down until you see the words “Download the pattern here”.
S t a c i
Ann – I used 24″ needles up through the whole shawl up until the border, then I used 60″.
S t a c i
When printing a pattern with tiny type in Adobe, sometimes I “take a snapshot” (in the edit menu) of a section or a chart and then print this snapshot, selecting “fit” and the selection fills a single page, enlarging to fit the pagd. This may mean multiple “snapshots” to complete the printing, but I don’t have a wide format printer, so it works pretty well for me. I especially do this with charts so they are easier to follow at a glance.
Another wonderful tutorial. Can’t wait to try this pattern. One question, though. I am fairly new to the ‘wrap and turn’ technique. I am surprised you didn’t cover picking up the wraps. Or am I missing something?
Hi Peggy – no need to pick up wraps in garter stitch! Just knit the stitch normally.
S t a c i
I am having trouble with the second full form on the Miss Grace shawl, the one with the yellow circle with the number 44 in it knit in the base color.
If I knit 43 st in and then knit 20 for the setup row, I will run out of room towards the end of the full form, I don’t have enough st on the needles to finish 3 more ridges to finish the full row.
What am I doing wrong?
Hope you can help.
Thank you.
Carol – to do the forms with the number 44 in a yellow circle:
knit across a right side row (toward the angled edge)
knit across the wrong side to 44 stitches **from the end, or straight edge**
knit 20 setup stitches
begin working Rows 1 and 2
S t a c i
I just ordered two kits, Sherri and Susie. Could not make up my mind on the color options. Sherri is on back order. It is probably so popular from your video so I expect it will take a little longer but they are pretty quick about fulfillment. I can hardly wait to get into this project with your help. Thank you for creating the video so we have the opportunity to try this project and be successful. I ordered the needles both 32″ and 60″ as well.
Hi Staci. Would it be easyer to pic up stits for the border with a tunisian chrochet hook. If you use Knit Pro you can just put on the knitting tips on the cabel afterwards ?
Hi from Meta
Meta – if you think it will be easier for you, you can certainly try it…I don’t think the Knitter’s Pride (Knit Pro) has a hook small enough for these stitches in the interchangeable Tunisian set.
Even with the option to pick up stitches with a crochet hook, I find it easier to use a knitting needle. But you should do it however you prefer!
S t a c i
Staci, Thanks for your tutorials and your sense of humor. I’m working on the Miss Grace Shawl. After a form is completed and I’m knitting the next row where all the wraps and turns are, it appears that it is very loose between these two rows. What did you do to prevent this from happening to you or is it unpreventable? It doesn’t seem to matter if I did the wrap tightly or not, it still seems to be loose in this area.
Thanks for any suggestion you may have.
I have the same question as Linda Myers the loose stitches in the wrap and turn area. There have also been numerous comments made in the knit along. Any suggestion as to how to tighten the stitches would be helpful.
Linda and Mary – the wrapped stitches end up looking a little different than those above and below it, but you really shouldn’t see large holes. You probably should check your gauge – if your gauge is loose, holes can appear. A bit of good news is that the look of little tension issues will improve with blocking.
S t a c i
Staci,
I too have had a problem with the large stitch resulting from the wrap portion of this pattern. I have found if I do the wrap before turning the project it will lessen the size of the stitch that is wrapped. The trick is to be sure you pick the stitch up from right needle to left by inserting your left needle into the back leg of the stitch entering between the slipped stitch and the previous knit stitch.
So, slip stitch as if to knit, bring yarn to front, put slipped stitch back on left needle then turn work!
Hope this helps others who are seeing the large holes in their work
Question about picking up all those stitches for the edging. I watched the video again several times (thank you again), and I carefully picked up the appropriate number of stitches, as close to the edge as possible but still under two strands for stability. The angled edge looks ok, but along the straight edge (where we carried all those extra strands along) I really do not like how thick and knobbly it looks and feels behind the newly picked up stitches. I guess it’s because of the extra strands, especially in the first few inches where I didn’t keep them as taut while carrying as I should have while getting used to how much tension was needed. I have not started knitting around yet. Will this even out once the edging is done and blocked? Is there a photo of how the edging meets the straight edge on the wrong side?
Ann – you can apply some steam to that edge to get an idea of how it will look when it’s blocked. There does end up being a little ridge whenever you pick up and knit stitches, but in this weight of yarn, and once the entire border is finished, it really shouldn’t be distracting.
S t a c i
A little confused with the second full form. I can see you have explained above but it seems you knit 44 on the right side then on the ws do you start with set up row 20? Sorry!
Actually I think I got it. The yellow numbers are the same as white ones. All full forms start on the wrong side. Am I right?
I started the shawl today with yarn from Mirasol Peru. The Skeino is not available in the Netherlands. My question is what you do with the wrapped stitches. I did not see it in the video. And I see SLWS at the beginning of the form and SLWSL at the end of the form. What is the difference
thank you for your help. I love all your video tutorials. Made a few granny ripples.
Martine Lakerveld
Martine – Skeino ships worldwide, including to the EU. The wraps are left in place…no need to do anything with them. If you see “SLWS” in the pattern it is likely a typo – there is only SLWSL as an abbreviation used.
S t a c i
I got big holes so I took the wraps on the needle and have knitting the stitch and wrap together. Try to do it again next time as you discribe
Martine – If you’re seeing holes, it is likely that your gauge is too loose. Since you’re using a different yarn, I can’t tell you what the correct needle size should be.
S t a c i
I use needlesize 3. The yarn is for needlesize 3,25. Those are not the US sizes?
Hi Staci!! I am all the way through this shawl and so excited to have mastered the tapestry knitting and my first time working with a CHART- and what a chart it was! My problem now is, even though I have watched your video ten times at least, I am having problems picking up the stitches for the border. I have made 6 dozen socks with DPNs, and know the basic gist of stitch picking up, but with these VERY long CIRCULAR needles I am getting confused. In your video, you have the starting row on the needles when you show how to pick up stitches WITH ANOTHER NEEDLE. I realize it is a sample size you are showing us, but if I start using my other side of the circulars to start picking up stitches, I will have one side of the circulars at the end of the first row (from 90 degree angle start to the end of where I knit back and forth all the pattern) and the other starting the first row of stitch pick ups, and a gap in the middle. What do I do when I get to the third angle, the second 45 degree angle without another needle? Turning corners with circulars seems nearly impossibly difficult, esp. with the kfb sm kfb situation. I can always grab another DPN when I make socks (a circular item) but how with these circulars? Where did I go wrong? Thanks tons for your help as I am already late with a special birthday present for my great aunt…. 🙂 Thanks so much for any help! Your inspired friend, Margot (also on FB)
Margot – just put the empty needle in your right hand, and start picking up all around. When you get to a corner, you can pull the cord “long” right there, since you’re kind of changing direction. You can have some extra cord hanging out right there at the corner, and you can pull it straight again once you are well into the next straight side.
S t a c i
Hi Stacey I’m a little confused about the white circle 2.
At the top of the instructions it says that this creates a half form at beginning of the row.
In the next section it states it can be half or full?
Jennifer – yes, I can see what you’re reading and why you’re getting confused. Just refer to the chart…the number in the white circle always indicates where to start the form, and the chart will tell you if it’s a full form or a half form. The first “2” you see is a half form, the second is a half form, and the third is a full form.
S t a c i