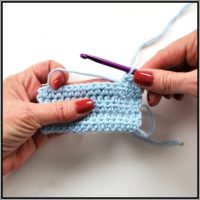
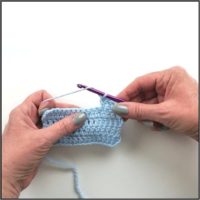
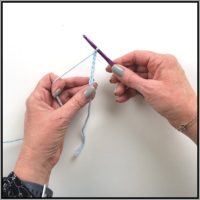
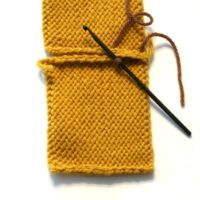
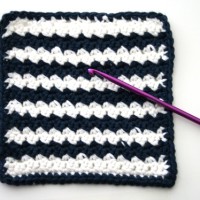
Here’s one way I like to use crochet for maximum “bang for the buck” in my knits.
Written instructions for working the crocheted flower:
CH 4, SL into first chain, making a ring.
CH 2, 8 DC into center of ring. Close the ring by SL into the 2nd chain you made at the beginning of this round.
(Change color here, if you like.)
Pull up a loop in new color.
*SL into next stitch, CH2.
4 DC into next stitch, CH 2.*
Repeat between the *s for 5 petals total.
Finish by SL into 1st SL of the round. Break yarn, weave in ends (or just tie them off and cut them, since it is unlikely that the back of the flower will show.)
Many thanks to Stephanie Gage of Spinning Colors for allowing us to use her pattern in this tutorial. Be sure to visit her shop, Spinning Colors, where she sells hand-crafted yarns.
She also has other patterns on Ravelry.
One of my favorite ways to work crochet into your knitting is with crocheted edgings. Here I show you how to work a spiked edge.
Crochet instructions for the spiked edging:
This edging looks best if you do it in a contrasting color. *Single crochet into 2 stitches, then make a “spike” by inserting your hook into the stitch below (or lower). Grab the yarn and pull up 1 loop, grab the yarn again and pull through two remaining loops. Skip next stitch. Repeat from *.
Knitting instructions for the long moss stitch:
CO an even number of stitches.
Row 1 (WS): *K1, P1*, repeat to end of row
Row 2: *P1, K1*, repeat to end of row
Row 3: *P1, K1*, repeat to end of row
Row 4: *K1, P1*, repeat to end of row
Row 5: *K1, P1*, repeat to end of row
Repeat Rows 2-4 to desired length. BO in pattern on RS of work.
One of my favorite ways to work crochet into your knitting is with crocheted edgings. Here I show you how to work a simple picot edging.
Crochet instructions for the picot edging:
Single crochet into 2 stitches, chain 3 (or 5). Insert your hook into the left leg
of the first chain. Grab the yarn and pull up one loop. (Two loops on hook). Grab the
yarn again and pull through both loops on hook to close with a single crochet. Skip
next stitch, and repeat from beginning.
Knitting instructions for the long moss stitch:
CO an even number of stitches.
Row 1 (WS): *K1, P1*, repeat to end of row
Row 2: *P1, K1*, repeat to end of row
Row 3: *P1, K1*, repeat to end of row
Row 4: *K1, P1*, repeat to end of row
Row 5: *K1, P1*, repeat to end of row
Repeat Rows 2-4 to desired length. BO in pattern on RS of work.
One of my favorite ways to work crochet into your knitting is with crocheted edgings. Here I show you how to work a simple scalloped edge.
Crochet instructions for the scalloped edge:
Single crochet into 1 stitch, *skip 2 stitches, 5 double crochets into next stitch, skip next 2 stitches, single crochet into next stitch, repeat from *. End by working a slip stitch into first single crochet. Note — at the corners of a square, work your count so that you work the double crochet stitches in the corner. I found that working 8 single crochets (instead of 5) made a nice corner.
Knitting instructions for the long moss stitch:
CO an even number of stitches.
Row 1 (WS): *K1, P1*, repeat to end of row
Row 2: *P1, K1*, repeat to end of row
Row 3: *P1, K1*, repeat to end of row
Row 4: *K1, P1*, repeat to end of row
Row 5: *K1, P1*, repeat to end of row
Repeat Rows 2-4 to desired length. BO in pattern on RS of work.
Half-way in height between a single crochet and a double crochet stitch, we have the half-double stitch. A pretty, compact stitch that looks like it’s made of little fans.
Size: Any size, each finished block of 6 rounds in the gauge below is approximately 6” square Hook: Size H crochet hook (5mm) Yarn: Three colors of worsted weight (10 ply) yarn (info on yardage amounts below) Additional Materials: Tapestry needle for weaving in ends Gauge: 4 double crochet stitches per inch
This pattern is a FREE RAVELRY DOWNLOAD, and the video tutorial can be viewed at the bottom of this post. (There are also links to the four-part video in the pattern.)
Typical Blanket Sizes: A baby blanket (at 42” square), will require 49 granny square blocks (7 blocks by 7 blocks). A throw blanket (at 48” x 66”) will require 88 granny squares (8 blocks by 11 blocks). A king-sized bedspread (at 90” square) will require 225 granny square blocks (15 blocks by 15 blocks). You can use the information in the pattern to make any size of blanket.
Yardage: In the gauge listed above, each granny square will require approximately 32 yards of yarn. In the photo above and in the video, I change color every two rounds.
For a 42” square baby blanket, 49 granny squares, changing color every two rounds:
• Color A (center of square), 220 yards
• Color B, 588 yards
• Color C (becomes border color for each square), 760 yards
For a 48” x 66” throw, 88 granny squares, changing color every two rounds:
• Color A (center of square), 396 yards
• Color B, 1056 yards
• Color C (becomes border color for each square), 1364 yards
For a 90” square king-sized bedspread, 225 granny square blocks, changing color every two rounds:
• Color A (center of square), 1012 yards
• Color B, 2700 yards
• Color C (becomes border color for each square), 3488 yards
Note: Working in a different gauge will require different yardage amounts. You can work up a single granny square and measure the amount you will need if you choose to use a different yarn weight and/or hook size.
The entire Crochet for Knitters Series can be found here.
More Crochet for Knitters videos in the weeks to come!
Information on things you’ll see in this video:
The yarn I used for the granny squares in the photo above (pink, cream, and green) is Berroco Vintage. (Sorry, I don’t have the information on the color numbers I used.)
In the multi-colored, single (giant!) granny square block I show in the video, I used a size G (4mm) crochet hook and Knit Picks Palette yarn.
A crocheted chain ring is the starting point for many different projects. For knitters, this is where we can really start to see one of the benefits of crochet (alone, and in combination with our knitting) – creating shapes in crochet is much easier than it is in knitting.
The other Crochet for Knitters videos can be found here.
More Crochet for Knitters videos in the weeks to come – next week we will start our first project!
Even if you’ve never crocheted before, being at least a little bit handy with a crochet hook will only make your knitting better!
We’re jumpstarting this series with three Crochet for Knitters videos. The first is an intro, then we go on to the two most basic stitches – chain stitch, and single crochet.
More Crochet for Knitters videos in the weeks to come!
Information on things you’ll see in these videos:
The sweater on the mannequin is the Saroyan Scarf, designed by Liz Abinante. Free pattern and video tutorial here.