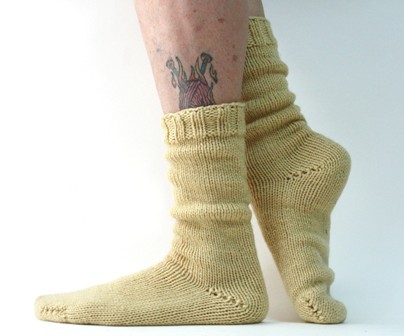
This video tutorial and pattern walks you through knitting two socks at-a-time, from the toe up, using a long circular needle and the magic loop method of knitting. Here’s what you get:
– Pattern includes instructions for both worsted weight and sock weight (fingering) yarn
– Pattern includes sizes for children, women, and men
– Links to a seven-part video tutorial that walks you through the tricky parts
Why should I learn to knit socks this way? This method might be right for you, if
– if you have “second sock syndrome”
– if you like using up ALL of your yarn, with no yarn left over
– if you’d rather not count your rows as you go to make an identical second sock
Worsted Weight Socks
Sizes: Child (5-10 years old), Women, Men (any size, all average widths)
Needles: Size 5 US (3.75mm) circular needles with at least a 32” cord
Yarn: 1 skein or hank of worsted-weight yarn (about 100 grams/200 yards) in wool or wool blend. This much yarn will make crew socks in the men’s size, and longer socks in the smaller two sizes.
Additional Materials: Crochet hook in size G or H, scrap yarn, tapestry needle for weaving in ends
Gauge: 5.5 stitches per inch in stockinette
Sock (Fingering) Weight Socks
Sizes: Child (5-10 years old), Women, Men (any size, all average widths)
Needles: Size 1 US (2.5mm) circular needles, at least 32” in length (longer is better)
Yarn: at least 400 yards of sock-weight yarn, wound into two equally-sized balls (I used Knit Picks Stroll)
Additional Materials: Crochet hook in size G or H, scrap yarn, tapestry needle for weaving in ends
Gauge: 9 stitches per inch in stockinette, unstretched
PDF pattern + links to 7-part instructional videos $10 US via PayPal ![]()


I purchased the other toe up pattern? What makes this different. Though I’m sure u say it in the video.
Thanks!
Xultar – yes, knitting two at-a-time makes things different than one toe-up, magic loop sock. The end result is the same, but getting there is a slightly different process – which is why this is the single most requested sock tutorial ever!
S t a c i
I had to figure out short-row heels 2 at a time on my own it was very hard because it was my first pair of socks. No other video or pattern showed it at the time when I tried last summer. I have held off on doing my second pair because of it.
WOW … JUST WOW! I will be getting this pattern for sure.
THANK YOU!!!
Hello,
I purchased your two at a time toe up socks pattern. Has the pattern changed? Or is it the same but there is now a video too
Thx
Trina
Trina – all of my sock tutorials have videos, and this is my only two at-a-time, toe-up pattern. Maybe you’re thinking of another pattern?
S t a c i
Sorry I left out that I purchased it a few months ago and I wanted to make sure it hadn’t changed since the video was released as it just popped up in my subscriptions today
Trina – this is an entirely new pattern and video, just released today. I don’t have any other sock tutorials that are two at-a-time and toe-up. Each of my sock tutorials includes videos.
S t a c i
Can you use Judy’s magic cast on with this pattern ? I’m constantly getting the crochet yarn tangled into my working yarn.
Jennifer – I don’t use that CO, but it is my understanding that it is a very different beginning than the one I use, and gets you started from the tip of the toe. The CO I use gets you started further up in the sock, then back down to the toe, then back up.
So I think the answer is no – this pattern will not work with that CO. Sorry!
S t a c i
I purchased this pattern and have worked the project up to finishing the toe and just beginning to work the foot in the magic loop method. I dont see where it says (or in the video) how many rows to work until I start the heel. I wear a size 8.5 shoe. Am I missing something?
Thanks for you time. I enjoy working your patterns.
Karen Heighway
Karen – it all depends on the foot length (shoe size) of the person you’re knitting the socks for. The pattern (both for worsted and sock weight) says “Continue in this manner until the length of the socks are XX” shorter than desired finished length.”, “XX” depending on the size and weight of yarn you’re using. Please look for that in your pattern.
S t a c i
Hello Staci, Thank you so much for teaching me this method of sock knitting. It seems alot easier and fun to do rather then the other way of making them. I heard in your video you were asked how to keep yarn from twisting. What I use to keep my yarn balls separate is this: http://www.marymaxim.com/portable-yarn-organizer.html Hope it helps!!
Hi Staci – I bought your pattern last night and haven’t been able to put the needles down! I only took up knitting about 4 weeks ago but the socks look perfect so far – your videos and row by row instructions are by far the most helpful I’ve seen and well worth the cost.
I did want to ask, is there a simple formula for adapting the pattern for chunkier yarn/bigger needles? Something around 10mm needles? I’d like a really chunky sock (similar to the one you demonstrate in your video) but am not confident enough yet to try and adapt the pattern…
Thanks so much for your help in advance!
Karyn
Karyn – good going with your socks! To answer your question…on my Frequently Asked Questions page, I give links for patterns that use sock yarn and smaller needles as a next step after finishing my sock tutorials. I don’t have any suggestions for chunkier socks, but there are plenty of patterns available on Ravelry. Once you’ve learned the techniques I teach you in my sock tutorials, it sets you up to be able to move on to all kinds of different patterns.
Here is a link to my FAQ page, if you’re interested in using sock yarn: https://verypink.com/frequently-asked-questions/
S t a c i
Thanks! Would you please tell us what brand of circular needles do you use in the video?
The needles I use in this video are Knitter’s Pride Symfonie Dreamz (wood) interchangeable needles.
S t a c i
Staci – just love your tutorials. Very informative but also fun and entertaining. I’ve been knitting since I was a little girl but you’ve renewed my love of it. I took a class (Entrelac) at my LYS and didn’t learn half as much nor enjoyed myself nearly as much as I did while watching your video on the subject. I just had surgery on my hand and watching this Magic Loop Toe Up Sock tutorial makes me so excited to recover and get back to knitting, so thank you! Please keep them coming!!!
Hi Staci,
I followed your tutorial, got clear through row 21 with no problems. However when I went to remove the provisional cast-on, the slip knot end was NOT on the left. My work looked just like yours with the provisional yarn in front and the live stitches in back, however I couldn’t upzip the CO. Where did I go wrong?
Virginia – I’m not sure how you ended up there, but you can still move on. Just be sure to remove the provisional cast on from the NON slip knot end, and proceed. It will look a little different because you’ll be unzipping and picking up from the wrong side of the work, but the live stitches will still be there.
S t a c i
My socks are successfully completed! Yay! One more question: Do you offer the pattern for the sweater you’re wearing in this video?
Virginia – the sweater I’m wearing (not my design, knit in a discontinued cotton yarn) can be found here:
http://www.ravelry.com/patterns/library/sitcom-chic
S t a c i
Staci, I’ve been knitting for many years and I love this two at a time, toe up method. My problem is that no matter how often practice, my increases at the toe area just do not look nice. Can you recommend another increase I can use instead?
Thank you for any suggestions!
Pamela
Pamela – increases at the toe area? Or do you mean the wrap & turns? They generally do look a bit wonky until after washing/blocking, which will improve the look. I have a video coming out on German Short rows in a few weeks which you may find you prefer.
S t a c i
Yes, sorry, I do mean the wrap and turns. I’d like to find a method for shaping the toe that is a bit more “invisible”?
Yes, I responded to your email, Pamela. I think you’ll find that you might like German Short Rows, and I have a video coming out soon.
S t a c i
My first time making toe up socks. I’m making them using up my sock weight yarn scraps. Had to rip them out the first time because they were too wide. Redoing using the child’s size and am up to the foot. Having a very hard time making the first stich tight enough even with a lot of effort so there is no hole.
Hi Staci,
First, thanks for all your wonderful tutorial videos!
I purchased your single toe-up magic loop sock pattern and video last year. Can I use the same pattern for this tutorial?
Aimee – the pattern used in these socks is slightly different, but you can probably use that same pattern if you’re willing to be a bit flexible with the video not exactly matching up with the pattern you’re using.
S t a c i
I have a large hole when I start back with magic loop after the heel. What am I doing wrong?
Hi Staci, I’d like to take this class so that I can knit my huge-footed husband a pair of socks with worsted weight yarn. Two questions: can I rib the entire length of the leg and would it be easy to translate magic loop instructions to two circulars?
Thanks a lot, you’re great.
Linda – this pattern includes instructions for men’s socks. The length does not matter – as long as your husband has a normal width foot, the socks will fit him. Yes, you can knit as much or as little ribbing as you like. If you are comfortable with two at-a-time, you should be able to do that.
S t a c i
I made these with worsted yarn and they’re the best-looking socks I’ve ever made! I’m about to start a pair with sock yarn, but I had a question first. You note a gauge of 9 stitches/inch. The yarn I have all says 7-8 stitches/inch on the yarn band. I normally go down a needle size (I knit tightly) – so with my yarn, I’m getting 7-8st/in on size 0 needles. Am I correct that to get to 9 st/inch I should go down to a size 00?
Allyson – yes, you want to use a smaller needle size to get more stitches per inch to get correct gauge.
But one thing you said is backwards…you said you normally go down a needle size because you knit tightly. If you knit tightly (in a tight gauge), you probably need to go up in needle sizes to get correct gauge. Just clarifying for others who are reading this!
S t a c i
Oh, that’s funny – can you tell I’m an entirely self-taught knitter? I’ve always thought I knit tightly. Perhaps I’m knitting loosely! But thank you for the clarification – I’ll be careful about gauge before beginning.
This pattern/tutorial is not available in a Kindle format like the mitten pattern is?
Rochelle – not yet! We’re always working on getting my patterns up in my Kindle store, but it takes a while! I’m not sure when this pattern will be available for Kindle – probably early in the new year.
S t a c i
Hi Staci…I’ve been doing this pattern but I get to the heel and go to begin kntting in the round again but have a problem. the end of the heel has the stitches finishing on a purl side with the needles pointing to the left. if I turn my needles around so they both face to the right, my working hard is in the front needle and not on the back needle like i started so I’ve been knitting an extra row to get myself set up again with the working yarn on the back needle. Only problem with this is when I go to knit in the round again, I have a gap…or a hole. am I doing something wrong? i watched the video but it doesn’t show what to do after the heel is done and the instructions just say to begin knitting in the round again.
Help! I have this hole and I end up having to pick up a side stitch and k2tog to get rid of it .
Heidi – I’m not sure how you ended up with the working yarn in the wrong place, but this has happened to me over the years before, too. Just knit (or purl) a row to get yourself in the right position. No harm done. Regarding gaps, I have a new video that should help: https://verypink.com/2014/11/26/correcting-gaps-in-socks/
S t a c i
I started a pair of socks earlier this week but when I took the provisional crochet chain the live stitches looked like dead stitches in that they looked as though they’d been bound off. So I raveled them and am starting over. I have a great deal of trouble picking up the working yarn through the “hyphens” with the knitting needles so I’ve been pulling the working yarn through and up on the knitting needle with a crochet hook. Do you think this might have something to do with it? Thanks for your help. Your videos are the best and I’ve recommended them to many friends.
Happy to report that this second time around worked. I think maybe on the first try I was picking up the row next to the original row?? But am happy it worked the second time. I’m off and running or knitting.
Mary Jane – I’m not sure what happened…if you’re following the provisional CO directions – picking up stitches from the slip knot end, unraveling from the non-slip knot end, you should end up with live stitches. I can’t say if the crochet hook has anything to do with it without seeing your work. You may want to try it without the crochet hook to see the results.
S t a c i
When I buy this pattern, is it immediately available for download, or do I have to wait for an email?
Your tutoriald are great, btw! You’re the first person I thought of, when I wanted to try making socks.
Elspeth – after you purchase a pattern, a download link is instantly and immediately sent to you, which will allow you to download the pattern.
S t a c i
I’ve watched your video on reinforcing the heel with an extra strand of yarn/thread, but I haven’t seen a video on reinforcing the toe from the beginning. Do you just start at the beginning with the other strand also? Or do you reinforce the toe in a pattern at all? Also, is there a tutorial on this process? Like how to end the second strand? Thanks. I’m anxious to buy the pattern and get started. 🙂
Faith – you can just hold your sock yarn together with a reinforcing yarn/thread and knit the toe that way. If you plan to run the reinforcing thread through after the fact, you can do it the same way I demonstrate in the heel.
S t a c i
Stacie, love this provisional CO. Is there a way to get to “say #5 or so without having to watch the entire video to get there? JO Ann
Yes, Jo Ann…within the written pattern, there are time-coded links that jump to each video segment.
S t a c i
Staci, I’m loving this pattern, so much easier to follow than another I’ve tried, the row by row details are brilliant. I’m looking for some help that I could not find in the pattern . . . How do I determine the length I need before starting the heel?
Thank you in advance for your assistance.
AnnaRobyn – the instructions for that are in the pattern, the last paragraph before the section titled “Heel”.
S t a c i
Dear Staci
Thank you so much for the wonderful tutorial. I have never done a magic loop with 2 sock but here I am thanking you because I just made my socks and now working on my foot. You are so good in taking your time to teach step by step…thank you again.