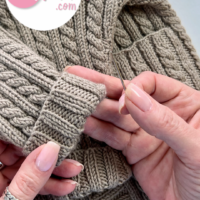
In this video, I demonstrate how to work Kitchener Stitch without a tapestry needle, using knitting needles only.
Here are the written instructions:
Setup A: Knit the stitch on the front needle, pull yarn through, leave that stitch on the needle
Setup B: Purl the stitch on the back needle, pull yarn through, leave that stitch on the needle
Work Setup A and B once, then follow these four steps:
1. Purl on the front needle, pull yarn through, pull that stitch off the needle
2. Knit on the front needle, pull yarn through, leave that stitch on
3. Knit on the back needle, pull yarn through, pull that stitch off the needle
4. Purl on the back needle, pull yarn through, leave that stitch on
(The chant I use after the Setup Stitches are: purl, off, knit / knit, off, purl)
The needles I’m using for demonstration are Knitter’s Pride Bamboo DPNs.
The yarn I’m using is Berroco Vintage Worsted.
My nail polish is Gelish, “I Or-kid You Not”.

Thank you so much for your help
How great! I will definitely use this as I do run into tension issues when Kitchnering. Thanks so much!!!!!
Huh. Just huh. This looks SO MUCH EASIER! You made my day! I get so confused after about the 8th one in using a tapestry needle and actually have threaded buttonhole thread through active stitches and slipped them off the needles since THEN it makes sense. I’ll be using this method from now on.
Staci!! I used this technique with the my Tunisian Crochet Shaker Dishcloth and it worked beautifully!! Thank you.. Love it!
I loved this….done for the first time today! Enjoying all your videos but cant find how to comment on YouTube. ?
I wish I’d seen your video yesterday before I Kitchener stitched the arms and feet of a knitted toy. I have tension issues using a tapestry needle. I’m going to try your technique on my next project. Thank you!