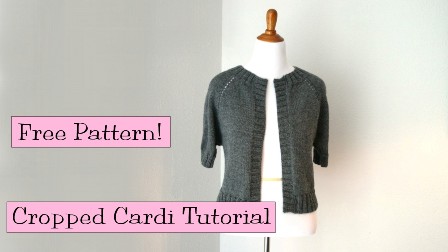
In this tutorial sponsored by Lion Brand Yarns, I walk you though knitting this versatile raglan cardigan. Get your free copy of the pattern here on the Lion Brand website. Important note – the pattern uses Lion Brand Organic Cotton Yarn, which has been discontinued. In my sweater, I used Lion Brand Wool-Ease.
Sizes: Small, Medium, Large, 1X, 2X
Actual Sweater Bust Measurement: 35 (38, 41, 44, 48) in. [89 (96.5, 104, 112, 122) cm]
Finished Length: 14 (15½, 17½, 19, 20½) in. [35.5 (39.5, 44.5, 48.5, 52) cm]
Yarn: Lion Brand Wool-Ease, 3 (3, 4, 5, 6) skeins
Needles: Size 7 and 8 US (4.5mm and 5mm) circular needles, 24″ or 32″ long
Gauge: 18 sts + 24 rows = 4″ (10cm) using larger needle size and stockinette stitch (knit a row, purl a row)
Additional Materials: 4 stitch markers, tapestry needle for weaving ends
Note: Pattern is written for smallest size with changes for larger sizes in parentheses. When only one number is given, it applies to all sizes. To follow pattern more easily, circle all numbers pertaining to your size before beginning.
To find a Lion Brand retailer near you, visit their website here.
Instructions for knitting the gauge swatch I show in the video:
Using the larger needle size, cast-on 28 stitches, work 5 ridges of garter stitch (9 knit rows).
Row 1: K across all stitches
Row 2: K 5, P to last 5 stitches, K 5
Repeat Rows 1 and 2 until stockinette part measures 4″.
Work 5 garter stitch ridges (knit all rows), and bind-off.
Information on things you’ll see in the video:
The yarn I used for my sweater is Lion Brand Wool-Ease in color Oxford Grey.
The yarn I use for demonstration in the tiny sweater is Lion Brand Wool-Ease in color Mushroom.
The circular needles I use for demonstration are Knitter’s Pride Nova Interchangeable circulars.
The stitch markers are made by this seller on etsy.
The nail polish I’m wearing is by Julep, color “Malala”.


yay! I love this sweater, and I’ve watched pretty much all of your videos, so I was absolutely in need of a new one from you! I’m so glad to See another one and thrilled to see it’s an adult sweater =) I’m working on your toddler top down right now, for my daughter, and I love it =) thank you! ,
Love the video and have learned so much from them. Thank you. Just a question regarding the button band. Your method is great, but in order to avoid a loose or floppy edge to my knitting I often slip the first stitch of a row or knit the first stitch on a purl row and vice versa. That means I don’t get a nice line of v’s like you do do picking up the right number for the band is trickier. Do you have any tips on how to get round this – or indeed, how to keep a nice edge to the body of the sweater?
Kathleen – I don’t ever recommend slipping stitches unless a pattern calls for it. I was able to get a really nice edge by working the edge stitches just like all of the rest of the stitches. Using a “forgiving” yarn (wool or wool blend) will help with that.
S t a c i
I’ve never made a sweater for myself before, so this might sound like a dumb question. Why is the length different on each size? I’m short, but I would wear a large in this sweater. I can understand the width of the pieces being larger, but why would the back and front pieces on larger sizes be longer than the smaller sizes?
A 5’2″ person could wear an extra-small or an extra large, but the length of the person’s back would still be the same. When I lose weight, I don’t shrink. 🙂
Staci:
OMG your video was awesome! I can’t wait to finish the project i am on so I can start this one 😉 OMG I *REALLY* can knit if I can manage to make a sweater!
I am interested in putting a button band on this one so it is not quite so open. I will wait patiently (especially since I have not started the sweater.)
I also like that there are several sizes given to fit a wider range of people.
Meg – sweater sizing just runs on standards. Where you would normally choose a petite, they just give one length-size in a knitting pattern, knowing the knitter can adjust the length as necessary.
S t a c i
Hi! I’m a fairly new knitter and your site is amazing! Thanks so much!
I just finished the toddler raglan sweater you have and it was a snap so i was just getting ready to try bigger people sweaters so now I’m all set!
I did have a question/suggestion… Are there other kinds of decorative increases we can use for raglan increases? I’ve now done this yarn over and the Kfb kinds. I just love the simplicity and ability to customize this style ????
Thanks!
Amy – you can use any increase you like, but you have to give thought to whether the increase uses up a stitch or not. KFB stitches “use” a stitch, while yarn-overs and M1 stitches do not. Any increase can be substituted for any other, as long as you consider this.
S t a c i
Lion Brand has two similar patterns.
These are shown in Ravelry.
1) http://www.ravelry.com/patterns/library/simple-raglan-cardi
and
2) http://www.ravelry.com/patterns/library/cropped-raglan-sweater
Which one is it? Thanks.
Kathy – the link is in the blog post, here where you commented…in big, bold letters. Here is the link again:
http://www.lionbrand.com/patterns/70111.html
Hi staci what needle size should I swatch with to start the 7 or 8
Isaiah – I explain that in the video – you want to check gauge with the larger needle size.
S t a c i
Hi Staci,
Can’t wait to try this sweater. To make a longer sleeve, would you do that when you added back the sleeve stitches instead of going right into the ribbing?
Thank you for the time you take to make your tutorials. You help so many people like me.
Linda
Linda – yes, I explain that in the video.
S t a c i
Dear Staci, Quick question – is there any reason why you couldn’t (or shouldn’t) go ahead and knit the sleeves in the round and then just stitch up the tiny hole left at the armpit, rather than doing a seamed? Thanks, Cindy
Cindy – if you are comfortable with modifying the pattern that way, then yes – that is an alternative.
S t a c i
Hi Staci, the pattern on the Lionbrand website calls for Organic Cotton yarn by Lionbrand, not Woolease. Do you interchange the yarn?
Thanks, Sharon
Sharon – yes, I explain that in the video.
S t a c i
Thanks so much. I enjoyed the video and I will try to make the cardigan. It looked like fun.
Patricia
Dear Staci,
Okay, here comes the size question. I still don’t think I understand about the ease thing (negative/positive). Can you tell me what size I need if I am a 36″ bust?
Karen – I explain in the video how you can try the incomplete sweater on before separating the sleeves to make sure you get the fit you want. I think a 36″ bust would probably wear the Medium/38″ size.
S t a c i
Hi Staci
Were you able to use the spit-splice technique on the Wool Ease yarn?
Thank you, Linda
Linda – I didn’t try spit-splicing the Wool-Ease yarn. It might work.
S t a c i
Question about the gauge: I’ve knit two swatches as you instructed so far, the first using the #8’s and the inner stockinette stitch area was 5″ square. I dropped down to a #6 needle and the square is 4.5″. Is it unheard of for someone who knits apparently as loose as I do to knit this cardigan with #3/#4 or #4/#5 needles? Basically as small as it takes to get the gauge?
Hi Staci, Just curious. I know you measured your gauge and stitch count after washing your swatch and it came out right on, I’d like to know if you also measured your gauge prior to washing and if it did shrink at all.
Thanks in advance.
Meg, you asked “but why would the back and front pieces on larger sizes be longer than the smaller sizes?” The additional rows aren’t added to lengthen your sweater, they’re used to cover the depth of your shoulder.
Grab a tape measure. Stand in front of a mirror facing the right or the left. Place the tape measure on your shoulder and measure it from the back to the front. If you carry weight in your upper back, slide the tape measure to include the width of that additional measurement.
Grab a friend who’s an XS and measure him/her the same way. You’ll notice that his/her shoulder depth including any upper back weight is a smaller number.
I have a 38″ bust and 29″ waist. I measured my shoulder depth and it is about 4.5″.
Linda – that’s a good question! I don’t have a 100% solid answer for you (I knit a lot of swatches), but I can tell you this – I normally check the gauge as I’m knitting, and make sure that I’m at least pretty close to gauge before I wash the swatch. This yarn held it’s shape pretty well with washing. No surprises. (A surprise would be, for example, a swatch that got super floppy and loose after washing, changing the gauge considerably.)
S t a c i
Hey Staci i just started knitting one of thease and i was using some lion brand wool ease yarn from annother project,i went out and baught annother skein of it todayband ibwas wondering if i could spit spice this yarn since it does contain wool?
Kendell – you can always try it, but it may not spit splice because of the fiber blend.
S t a c i
Hi quick question about the yarn. I input “wool ease” and several options came up. Is there a SKU# or other name to locate the yarn type in the website?
Thanks a bunch…!
If I wanted to make the sleeves longer – either full length or maybe 3/4 – could I just use the larger needles and do stockinettte rounds for the length I choose and then change to smaller needles and finish with the k2, p2 rib? (Since I haven’t experimented on changing sleeve lengths in a pattern before, I am not sure if there would be a problem doing this, such as the sleeve looking too bulky and maybe having to decrease somewhere along the way. I apologize if it is a rather dumb question.)
Reply to Cindy. Yes that is exactly what I did to get longer sleeves. It turned out really great. Staci explained that in the video as well.
Thank you, Lucy. I actually missed it the first time around (probably multi-tasking…poorly!) and, when you responded, listened again…and there it was.
Hey any hints on the yarn “wool-ease” that you guys used. I’m not sure which option to go with…?
Matt: This wool-ease is simply a worsted weight with no other discription on the label. The label states 3oz net weight (85g), 197yds (180m) and is graded a #4/medium thickness. Perhaps this will clarify?
Hi Staci,
I finished the back and have a question about the sleeves. Had an idea to try to make long sleeves, but quickly found out they would be to wide. You give many “rule of thumbs”, which I love. Is there a there a general rule about the number of decrease rows in a long sleeve to get to a right size cuff? Thank you again for all your wonderful tutorials. You give everyone the opportunity to experiment!
Linda
Linda – I have not test knit longer sleeves on this sweater myself, so I cannot give you a solid answer (and there really isn’t a rule of thumb to follow here). If I were to knit longer sleeves, I’d probably try decreasing every 6th round, and then see how that progressed.
Good luck!
S t a c i
Staci, you are the BEST! Thank you for doing such a wonderful job.
Thank you Staci, will make this sweater with long sleeves, lots of good advice from your web site. I’ve been knitting and crocheting for over 50 years so it should turn out okay I’ve made sweaters and booties for babies and bigger sweaters for 3 and 4 year olds, lots of hats, scarves and mittens so this should not be too hard, I just hope I get a chance to finish it, I have so many things started and not finished. Don’t know if you’re like me but I get bored too quickly even at my age, I’m 71. I buy and buy yarn with big projects on my mind, get started then stop. So thanks again for this project I will be knitting right along side of you in this video.
Hi Staci, I am trying this pattern, and I have stop at after row 5 because as the pattern said after row 5 continuing to increase before and after marker 2 sts, that means total 8 sts for one row, right? and the pattern said do for 24 more time for small size, so I do the math, for example row 5 of small size end of total 112 sts, if do 24 times more it would be 314 sts! not 280 sts as the pattern wrote down! Please explain!
Thuan – I’m not sure why you’re confused…you only increase on right-side rows, wrong-side rows are purl only. The math in the pattern is correct.
S t a c i
would it be possible for you to upsize this pattern for 60 inch chest i love it very simple and clean looking
best wishes Chrissy
Chrissy – the beauty of a raglan-style sweater is that you can continue with the increases until you get the size you need, the separate the sleeves once you reach that size. You’ll need to allow for more yarn, but sizing up this style of sweater is pretty easy.
Good luck!
S t a c i
Can this be made longer to make a cardigan?
Sharon – I address this in the video…the cardigan can be made any length. You just need to allow for additional yarn.
S t a c i
Staci,
Loving this pattern and your tutorial! I am almost ready to remove the sleeves when I noticed about 5 rows back in one of the raglan segments I evidently just knitted through them without doing the yarn overs. Is there a way to fix this? Mentally, it’s freaking me out to try and visualize how to do it. Could that be the source of a future video? (hint…hint…hint). My other option is to put in a life line before my screw up and rip back to that section. This also terrifies me because of the raglan parts. Is there a trick to doing it?
Peggy – there isn’t really a good way to fix that, because if you drop a column of stitches and add a yarn over, subsequent rows won’t have enough yarn to carry that new stitch up to the live stitches. You can, however, rip back. It’s up to you if you want to use a lifeline or not. I would probably rip back past the row where you missed the yo, because the next row is a WS row, and just purl stitches – no pesky yos to try to figure out. Grab a needle in a smaller size, and pick up the stitches again, then continue with the next RS row right off the smaller needles, on to the correct size.
Good luck!
S t a c i
I love your videos they are so helpful. You explain things so well. Keep up the excellent work Live this pattern too. Will certainly knit this at some point!!
Je vous remercie Stacy pour vos vidéos et pour la précision de vos explications. Il n’est pas nécessaire d’être anglophone pour comprendre… Thank you very much !
I would like to know where the for the red and gray sweater shown while demonstrating the knitters pride needles