
Pronounced ZA-zee-oh.
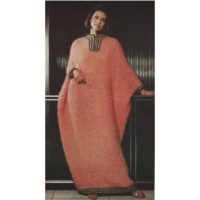
In this five-part tutorial, we’re going to learn to make this sweater – err, coat – if you live in a warm place, like I do.
This is a top-down raglan sweater. There are two huge advantages to knitting this style. First, no seaming. Second, you can try the sweater on while you’re knitting it, so you can be sure that you’ll have a perfect fit when you’re finished.
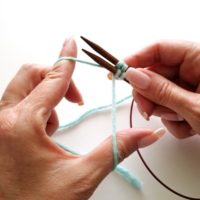
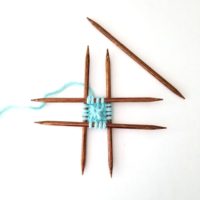
In this tutorial we cover working raglan increases, separating the sleeves, using the magic loop method to knit the sleeves, how to ensure a good fit, working tidy seed stitch, picking up and knitting the short-row collar, working the buttonhole, and more.
I’m going to say this is an intermediate pattern. You need to be comfortable with knitting, purling, and basic pattern reading. You don’t need prior sweater knitting experience – you just need to be comfortable with the basics of knitting. Everything else is covered in the video. You can view the video at the bottom of this post.

Sizes: XSmall, Small, Medium, Large, XLarge, 2XLarge, 3XLarge [to fit actual bust measurements of 28” (32”, 36”, 40”, 44”, 48”, 52”)] PLEASE READ NOTES ON SIZING BELOW
Needles: Size 7 US 32” circular needle
Yarn: any worsted-weight wool or wool blend, 1010 (1150, 1300, 1440, 1600, 1730, 1880) yards
Additional Materials: One 1 1/8” button, four stitch markers, tapestry needle, row counter, scrap yarn
Gauge: 20 stitches and 25 rows over 4” in stockinette. (Stitch gauge is very important, row gauge is less important. Base your needle size on stitch gauge if you’re having difficulty matching both.) Be sure to measure gauge after you’ve washed and blocked your swatch.
Notes on Sizing – The measurements above are for the actual bust measurement of the sweater wearer. The finished sweater includes “ease” for a casual fit. The measurements of the finished sweaters are 32 (36, 40.5, 44, 49.5, 53, 56)”. Additionally, this sweater is a straight fit (with no shaping), therefore the bust and hip measurements are the same. For a good fit, you should choose the size that fits whichever measurement is greater – either your bust or your hips.
Pattern + links to 5-part instructional videos $8 US via PayPal ![]()
And the video:
Information on things you’ll see in this video:
The sweater I’m wearing is my Ombre Dyed Sweater.
The ball-chain stitch markers I use are from Rycrafty.
The nail color I’m wearing is by OPI, called “Nein! Nein! Nein! OK, Fine!”
My watch ring is made by Davis.
Sorry – I don’t know the yarn I’m using in the sample. But the needles I’m using are Addi Turbos.
If you’ve made it this far in the post and you want to know the origin of the name, ask me. I’ll explain in the comments. I expect that some people have already figured it out. Yay!
Hi Staci,
I have been knitting for some years now and have taken tutorials from may of the videos posted on YouTube….but i love yours the most. You are a superb instructor a and i love all the different designs on your website.
I have recently purchased the Zasio pattern and I am already at it. I will soon be reaching the point where I have to pick stitches for the collar, I am finding it a little difficult to understand the short rows and and how to continue knitting the bottom part of the collar after the short rows, as the video does not illustrate this part.
(I have seen your tutorials of the wrap and turn as well as the pick up stitches after the wraps).
Looking forward to hearing from you.
Best Puja
Puja – I think if you’ll find that if you follow the pattern, row by row, it is all there. The short rows start very short, but eventually get longer and longer until the entire front opening of the sweater is covered in collar.
If you have a specific question, I’m happy to help. Right now all I can tell you is to trust the pattern!
S t a c i
Cheers and much thanks for all you share to help all of us
I have bought this pattern and have a concern think you may be able to help with = can you suggest another yarn that would not be as heavy to wear for the person I am going to attempt to make this for she has pain issues therefore, after knitting down to a quarter of the body she tried on, just too heavy for her any suggestions would be so very much appreciated
much thanks
Hi Staci,
Thanks for your reply to my earlier querry regarding the collar.
Need your help on one more point.
I just finished picking up the wrap stiches and have knitted one more inch of collar width from L bottom to R bottom of the collar, however the picked up stiches part looks untidy compared to other part of the collar. I have maintained seed stitch pattern in the entire knitting of collor. Pls advise how to correct this.
(i follwed your tutorial of wrap and turn and pick up stitch after wrap- the RS pick wrap method ).
Thanks
Puja
Puja – before you can really decide how the picked up stitches look, you should apply some steam (from a steam iron) and pat out the stitches to get an idea of how blocking will improve the look. (Provided you have used a wool or wool-blend yarn.) You should see a great improvement in the look of the stitches.
If you don’t see a marked improvement, you may want to rip back and pick up the stitches again, paying careful attention to spacing.
S t a c i
Hi Staci,
I’m having the same untidiness of the wrapped stitches on my collar too. It almost looks like a runner in a stocking. I’m using an acrylic yarn (Impeccable worsted) so I don’t know yet if the steaming will help. Would washing the sweater help it at all? I liked your tip on giving a tug when doing the seed stitch. It made a great improvement on my seed stitch and now I really like the stitch. Is there a similar tip that would help make these wrapped stitches blend in better such as tugging the yarn somewhere in the W&T steps?
I’m enjoying knitting this sweater. It’s my first one to try. I started to learn knitting less than a year ago mainly by watching videos such as yours. I would like to make another sweater so any suggestions on the W&T would be good to know before I try the collar again. Thanks for the great tutorials and patterns!
Staci,
I love the look of Zasio but I am worried about the straightness of the sweater body. I am pear shaped . I fear making the appropriate size for my hip measurement will result in a sweater that is too big at the shoulders.
I plan to try to add in a bit of shaping to have the body flair out a bit towards the bottom.
Any wisdom you can offer me on this ?
Thanks,
Diane
Diane – if your hip measurement is significantly larger than your bust measurement, this might not be the best choice for you. And you’re right about the shape…if you increase to fit hips, you might get too much bust. If I were you, I’d look on Ravelry for a swing coat. They are so cute and flattering to all shapes!
If you’re confident with modifying the pattern, good for you! I haven’t test knit this in any shape but what I offer, so I don’t have any advice for you on that.
S t a c i
Hi Staci, I’m currently knitting the body and have a question about how the fit should feel. It fits snugly, not too tight around the armpits but not too loose either. Will it loosen up as I knit more and then actually get to the sleeves? Or should I have made it a tad bit wider before I separated the sleeves?
Sam – remember that you’re probably gong to be layering this sweater over at least a long sleeved shirt, so leave plenty of room under the arms for that. Also keep in mind that the collar will add a lot of fabric to the front, so if you’re unable to “close” the fronts now, that’s okay.
S t a c i
The rest of it seems to fit fine, it’s just the tightness in the arms that I’m not so sure about yet. Is there a way to widen the sleeves without frogging? Or will it not feel as tight once there’s more of a sleeve to it?
Sam – tightness under the sleeves is an indication that you need to continue with the raglan increases for a bit. If you’re able to get the sweater on now and it just feels a bit tight, it won’t take much.
S t a c i
im confused in how to measure the gauge of the sweater, ur pattern says 20 stitches and 25 rows over 4 inches.
i knitted out 20 stitches to 25 rows, and the rows measure 4 inches and the stitches measure 3.5 inches, im not sure if this gauge is right or if i have to go up a needle size.
im a beginner at knitting sweater and this is the first that im knitting for my mum and i dont want it to go wrong.
Tan – if you’re having difficulty getting both stitch and row gauge, focus on stitch gauge only. That is the one that is really important in this pattern. Row gauge (length) isn’t nearly as important for sizing.
S t a c i
Hi Staci,
Can I use super bulky wool yarn (50g)? Would it create more body for the coat?
Cheers,
Joey
Joey – using a bulky yarn will add too much weight to this sweater and cause it to hang in a bad way. I recommend sticking with the worsted weight for this sweater, and finding a different pattern for a bulky sweater if you want something heavier (like this one: https://verypink.com/2013/11/27/easy-knit-sweater-jacket/)
S t a c i
Know if it was me putting a buttom on this sweater I would rape the yarn around the thread or the shank of the button two or three time to give more strenth. Becauce up where I live you would be buttoning the sweater on very cool fall days. And sometime I would be wearning a lomg sleeve blouse under it.
Will your zasio sweater pattern be available for purchase on the Amazon website soon?
Hi Ann – we’re working on getting all of my patterns setup for Kindles, but it’s taking a while! I’m afraid I can’t give an estimated date for that, sorry. But we are working on it!
🙂
S t a c i
Staci,
I was watching your videos on weaving in ends, and on the last video what is the name of the sweater on the mannequin. I love watching your videos and I have made one jacket ‘Easy-Knit-Sweater-Jacket’. I receive a lot of compliments on it.
Thank you
Carol
Hi Stacy, I am using a wool blend yarn that is washable and I don’t have any wool wash. Could I either use regular detergent on a gentle cycle or something or hand wash it in baby shampoo. Thanks!
Leah – you will need to follow the instructions on the yarn label. Sorry, I can’t help you here – I don’t recommend using regular laundry detergent, and I don’t have experience with using baby shampoo. You might want to try washing your swatch first, and making sure it will be okay for the whole sweater.
S t a c i
Staci, thanks for all your great videos!! I have just purchased this pattern and I am wondering if I could use a cotton blend yarn like Berroco Linsey, Modern Cotton or Classic Elite Classic Silk? Thanks in advance for time in addressing this matter.
Patricia – I’m not familiar with those yarns, sorry. There is a chance that a different fiber (non-wool) will hang differently than wool, since wool is very light weight, specially compared to cotton. A cotton sweater could stretch out and look uneven when it’s worn…that’s a possibility, but I have not test knit this in cotton to give you a solid answer.
S t a c i
Janet – I don’t recommend steaming acrylic unless you test the yarn first. Washing and blocking the sweater when you’re finished should improve the look. However, I’m afraid the issue might be with your yarn choice. Wool (and some wool blend) yarns are very forgiving with small tension issues, and wraps and turns can cause small tension issues, which is why I recommend wool yarn for this sweater. There really is no trick to the wraps & turns…if you’re working the technique correctly (as I demonstrate in the video), that’s the only trick!
Good luck!
S t a c i