
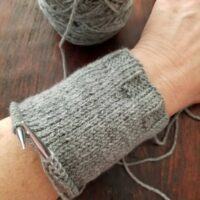
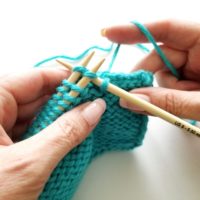
The Linen Stitch is a simple, two-row repeat that makes a dense, flat fabric that looks woven instead of knit.
Want to give it a try? Download the free Ravelry PDF, which includes a link to an instructional video on the Linen Stitch. (The video is also available at the bottom of this post.
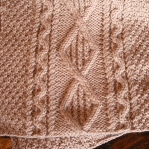
For a little variation, here is the stitch knit in two-row stripes. Cool zig-zaggy look!

And here it is knit by holding two strands of yarn together as if they were one –

Maybe you already have ideas for projects using this stitch, but here are some of mine. Placemats, table runners, rugs…yes, all of my ideas seem to revolve around home decor.
Have fun!
Staci,
Wow that looks like fun. I will have to try that! Thanks!
Betty
Staci,
We are building a new house and I have been looking for new kitchen placemats, now I know what I want to do. I will use this stitch and make my own 🙂
Thank you
Sandy
Hi Staci
I LOVE the scarf you wear in this vdo! Is there a pattern for it that you can share?
Thank you 🙂
Vikky
Vickky – the shawl I’m wearing in this video is called Ishbel, and can be found here:
http://www.ravelry.com/patterns/library/ishbel
🙂
S t a c i
Staci, can this be done in the round?
Hi Strix – yes, this can be done in the round. You’d just have to rethink the wrong-side row to make every row a right-side round.
S t a c i
Staci – what yarn (type and weight) did you use in the two stripe version? And the needle size? I know you said any yarn/needle size would work – but I’m a novice when it comes to picking out yarn.
Hi Laura – in the striped sample, I used worsted-weight yarn and size 7 needles. Please understand that tension-wise, your mileage may vary!
Also, in the solid (tan) color, I used bulky yarn and size 10.5 needles.
Hope that helps!
Great technique! Love your clear videos and instructions – huge help!
Janet
FYI I was at Home Depot yesterday and the newest issue of COuntry Living has a feature on yarn and home decor – loved all the textures! Check it out if you get a chance!
I look forward to trying the linen stitch. Mahalo!
Is there a “direction” that needs to be respected with the linen stitch? By that, I mean, if I make a scarf in it, do I need to do it lengthwise, or will it look just as good width-wise? TYVM
Hi Ellen – the direction you choose to knit is entirely personal preference. If i were you, I’d knit up a swatch with the yarn(s) I’m using, and make a decision about direction after seeing how it knits up.
Good luck!
Greetings Staci, Which seaming technique do you recommend for a purse/ side seam (Linen stitch) to attach a handle? By the way, thank you for all you do 🙂 I for one, appreciate you.
Hi Staci,
This stitch really looks cool and I want to try. You advice to start with second row. When do I start with different colour yarn for zig zaggy pattern? Is it row 1 or 2 from written description?
Thank you.
Hi Vilma – to work the striped Linen Stitch, work two rows in one color, then work the next two rows in the other color, and continue altering that same way. So the new color stripe always begins at Row 1 again.
🙂
Thank you Staci for your terrific video turorials. The first one I did was two socks on two circular needles. (Can I attach a pic?) I loved doing that project! Your videos are like having my sister or my mom–my first knitting mentors– right at my side.
That is so pretty!
Hello Staci,
Thanks so much for sharing this stitch, I am very excited to start on a bath mat in the zig zaggy combo. All of your videos are much appreciated.
You know, watching one of your videos is like having a little visit with a friend!
Stacy:
This seems like it should be so easy, so I don’t know what I’m doing wrong. I was working two rows one color and two rows a different color.
So I’m knitting along, then I notice that on the wrong side, it’s bunching up. One side of the project is not as wide as the other. I have no idea how this is happening. I have torn out this project 5 times, and it keeps happening. Maybe you can offer some help.
I have to fight the feeling to fling it across the room.
Debbie – are you keeping careful track of your rows? Like with a row counter or tally marks on a piece of paper? The pattern, as written should work out better than this. 🙂
It sounds to me like you’re getting confused with what row you’re on, and you’re slipping the same stitch more than once. That would certainly cause bunching and uneven fabric.
Without seeing your work myself, this is what I think is happening. Don’t give up – this stitch is worth it!
🙂
S t a c i
Is it possible to Knit a Buttonhole into the pattern and if so how do I it?
Also thank you for your Magic Loop Sock Class it was amazing for a new sock knitter
For a tiny buttonhole in this stitch, you should be able to simply do a K2tog, YO…then pick up the pattern as set on the next row. For a larger buttonhole, you can BO the number of stitches required for the size of buttons you’re using, then use the backwards loop CO to CO the same number of stitches on the next row, then pick up the pattern again on the third row.
Hope that helps!
S t a c i
Found your linen stitch last night (past 2am) and had to come ack today and revisit. Your patterns and directions are great. It’s so nice to have a concise explaination (even with the mistakes, cause we all make them) and mental picture of how our projects will turn out. Now, that my mouth has carried me away, I need to shut up and start knitting. I’m sure placemats (for Christmas presents) are in my future. You have given me lots of ideas about that yarn in my stash. Thanks, I’ll be looking for more of your videos.
I love this! I wonder….how would this stitch work on a ruffled hat brim using worsted weight yarn…..too stiff?
Hey Staci,
I was wondering if this pattern would be good pattern to use if I wanted to do a blanket? I know that you said it is a great pattern for “rouund the house”. But have you tried this as a blanket or afgahn? if so what are your thoughts?
Huge Fan!!!
Hi Amanda – I suggest you knit up a swatch for yourself, using the yarn and needle size you’d like to use for a blanket, and see how you like it. I can imagine this stitch making a great blanket with the right yarn and needle combination!
S t a c i
Hello Staci,
Thank you for your great video of this stitch… and for the buttonhole instructions I will need for my project. I fell in love with the Linen Stitch so much that I frogged a sweater I was doing and began in Linen Stitch. The stitch goes slowly compared to other stitches, but offers thickness and uncurling flatness that I so appreciate.
I had trouble converting from RS to WS with this stitch, so I swatched to knit in the round, and changed the pattern so I can steek it to a cardigan afterwards.
So far, so good… ‘cept for the part where I need to increase and decrease for shaping. The swatch I worked on last night looks as though I could have a problem. Am I barking up the wrong tree with increases and decreases? It is nearly KNITTING TIME and I am to the point where I need to begin decreases.
Any info you can offer will be appreciated beyond words.
Thank you again for all you do for us.
MJ
Hi MJ – I’m afraid you will need to test knit decreases in linen stitch yourself, as I’ve never tried it, and I’m not comfortable giving advice without putting rubber to the road. Good luck with your sweater!
S t a c i
I love this stitch and can’t wait to try it. The video was was great and very informative. What green one button sweater do you have on the mannequin? Thank you. Beth
Hi Beth – that green sweater is loosely based on this pattern:
http://www.ravelry.com/patterns/library/cropped-raglan-sweater
Hope that helps!
S t a c i
Hello Staci,
After testing increases and decreases (in what little time I’ve had lately), I have NOT found a suitable decrease I like yet. Everything has fumbled the beautiful smooth texture of the Linen Stitch. If I find a decrease I’m pleased with, I will let you and your readers know.
I have found that KFB works perfectly as an increase. Because the Linen Stitch is a two stitch repeat, the two new stitches work with the pattern easily. Staying ‘in pattern’ is NOT a problem at all.
Thank you again for your help. Have a great day!
MJ
Sorry Staci and readers… I should have said knit 2 front and back. A single KFB only increases the stitch count by ONE stitch, which will not work with the Linen Stitch. By making 2KFB, the pattern will stay in step.
Have a great day!
MJ
Have you ever considered about including a little bit more than just your articles?
I mean, what you say is valuable and everything.
However think about if you added some great visuals or videos to give your posts more,
“pop”! Your content is excellent but with images and videos, this site could
undeniably be one of the best in its field.
Wonderful blog!
Hello Stacy, Love your videos and all of your instructions and patterns. I have been trying to get the “zig Zag” affect doing the linen stitch in two colors. Mine doesn’t look like yours at all. I am doing 2 rows of one color and then 2 rows of the next color. What am I doing wrong?
Verna – thank you for the note. If you’re changing color in linen stitch every two rows, you’re doing it exactly as I did. My guess is that it’s the colors you’re using that are making it look different than the swatch I knit…? That’s my best guess, without seeing your work.
S t a c i
Hi Staci,
is there a way to make this stitch reversible. I have seen a girl wearing a beautiful scarf that looked like knitted in linen stitch (2 colours)… but then wouldn’t it look different on the 2 sides?or is there a similar stitch which will look reversible great for scarves?
thanks Fede
Hi Fede – yes, the back of Linen Stitch does look different from the front, but it’s not bad. If you do want two “right sides” for a scarf, the solution is to work Linen Stitch in the round, then seam the top and bottom edges of the scarf.
Hope that helps!
S t a c i
I’ve used this stitch before-but not with your ease! I am really impresed with your flow. Zip zip and zip. Very nice. One more thing for me to work toward.
I have not figured out how to do the bind off correctly. When I do so, I end out with too many stitches on the right needle.
I’d LOVE to see a video. I made a great piece using four colors and I want to bind off the best I can.
Pleease help.
Thanks, Jolyn
Ah ha, I think I see how to bind off.
I would write it like this:
K1, S1, BO1,
*K1, BO 1, S1, BO 1
repeat to end
That seems to be working.
Cheers,
Jolyn
gan izin kopi artikelnya boleh?…thanks
Hi Stacy , I was just woundering if you have any tutorials on table placemat.because i would like to learn how to make them please and thank you
Michelle – you don’t really need a tutorial or even a pattern to work placemats in this stitch. Just cast-on an even number of stitches as wide as you’d like the placemats, then work until you’re happy with the length. That’s it!
🙂
S t a c i
Hi!
I’ve been knitting coasters in this stitch and they’re just gorgeous! I knitted one with 2 colors, so I could get the zig zag pattern, but now I’m having trouble on how to bind off with those 2 colors! I’m new to knitting, thank you! I love your videos!
Thanks for all of your tutorials., I’ve just discovered them last night. I’ve started knitting again after many years and wanted to learn new techniques. Your videos have helped a great deal! I can’t wait to try the linen stitch. Thanks again!
I just added this site to my google reader, excellent stuff. Cannot get enough!
I worked up my swatch but am having trouble figuring out how to count the stitches per inch because I’m not accustomed to seeing the stitches this way. Any suggestions or is there a video somewhere? I cannot find anything online about this. TIA!!
I would like to knit 6 placemats in the linen stitch using Lion Brand Cotton-Ease yarn (Medium Worsted Weight 3.5 oz/100g skein – 207 yds) Approximately how many skeins of yarn would this require.
Thanks