Placing Buttons

Here is my video on actually making the buttonholes.

Information on things you’ll see in this video:

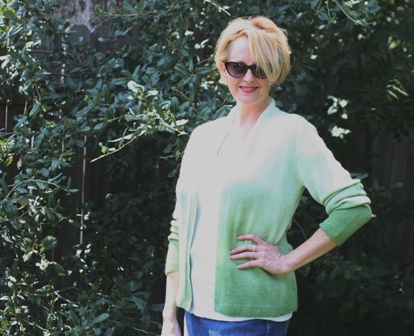
The sweater I’m wearing is my Ombre Dyed Sweater, pattern + video tutorial.

The baby sweater I use to demonstrate is my Striped Cardi and Beanie/Beret pattern and video tutorial.

The “clippie markers” I use can be found here.

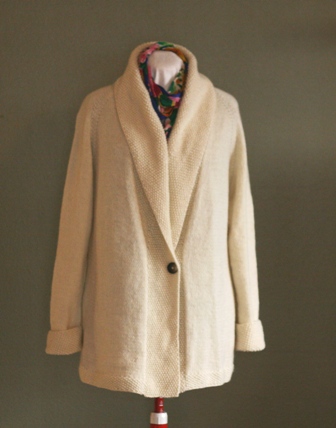
The sweater on the mannequin is hard to see, but it’s the Central Park Hoodie (not my pattern).

The nail color I’m wearing is by OPI, called “Nein! Nein! Nein! OK, Fine!”

My watch ring is made by Davis.

Grafting Rib Stitches

Here I demonstrate how to do Kitchener Stitch in 2×2 ribbing, so that there are no breaks between the knit and purl stitches.

You’ll find this much easier if you already understand how to work Kitchener Stitch in Stockinette stitch. Here is my video on regular Kitchener Stitch.

Here are the written instructions for working this:
Setup:
Front Needle: go into stitch as if to purl
Back Needle: go into stitch as if to knit

Knit Stitches:
FN: go into stitch as if to knit, pull that stitch off needle, go into next stitch as if to purl
BN: go into stitch as if to purl, pull that stitch off needle, go into next stitch as if to knit

FN: go into stitch as if to knit, pull that stitch off needle, go into next stitch as if to purl
BN: go into stitch as if to knit, pull that stitch off needle, go into next stitch as if to purl

Purl Stitches:
FN: go into stitch as if to knit, pull that stitch off needle, go into next stitch as if to purl
BN: go into stitch as if to knit, pull that stitch off needle, go into next stitch as if to purl

FN: go into stitch as if to knit, pull that stitch off needle, go into next stitch as if to purl
BN: go into stitch as if to purl, pull that stitch off needle, go into next stitch as if to knit

Information on things you’ll see in this video:

The sweater I’m wearing is my Ombre Dyed Sweater, pattern + video tutorial.

The sweater on the mannequin is hard to see, but it’s the Central Park Hoodie (not my pattern).

The nail color I’m wearing is by OPI, called “Nein! Nein! Nein! OK, Fine!”

My watch ring is made by Davis.

Sorry – I don’t know the yarn I’m using in the sample. But the needles I’m using are Crystal Palace Bamboo Double-Pointed needles.

Weaving in Ends in Ribbing

Information on things you’ll see in this video:

The sweater I’m wearing is my Ombre Dyed Sweater, pattern + video tutorial.

The sweater on the mannequin is my Zasio Sweater Coat, pattern + video tutorial.

The nail color I’m wearing is by OPI, called “Nein! Nein! Nein! OK, Fine!”

My watch ring is made by Davis.

Sorry – I don’t know the yarn I’m using in the sample. But the needles I’m using are Crystal Palace Bamboo Double-Pointed needles.

Zasio Sweater Coat

Pronounced ZA-zee-oh.

In this five-part tutorial, we’re going to learn to make this sweater – err, coat – if you live in a warm place, like I do.

This is a top-down raglan sweater. There are two huge advantages to knitting this style. First, no seaming. Second, you can try the sweater on while you’re knitting it, so you can be sure that you’ll have a perfect fit when you’re finished.

In this tutorial we cover working raglan increases, separating the sleeves, using the magic loop method to knit the sleeves, how to ensure a good fit, working tidy seed stitch, picking up and knitting the short-row collar, working the buttonhole, and more.

I’m going to say this is an intermediate pattern. You need to be comfortable with knitting, purling, and basic pattern reading. You don’t need prior sweater knitting experience – you just need to be comfortable with the basics of knitting. Everything else is covered in the video. You can view the video at the bottom of this post.

Sizes: XSmall, Small, Medium, Large, XLarge, 2XLarge, 3XLarge [to fit actual bust measurements of 28” (32”, 36”, 40”, 44”, 48”, 52”)] PLEASE READ NOTES ON SIZING BELOW
Needles: Size 7 US 32” circular needle
Yarn: any worsted-weight wool or wool blend, 1010 (1150, 1300, 1440, 1600, 1730, 1880) yards
Additional Materials: One 1 1/8” button, four stitch markers, tapestry needle, row counter, scrap yarn
Gauge: 20 stitches and 25 rows over 4” in stockinette. (Stitch gauge is very important, row gauge is less important. Base your needle size on stitch gauge if you’re having difficulty matching both.) Be sure to measure gauge after you’ve washed and blocked your swatch.

Notes on Sizing – The measurements above are for the actual bust measurement of the sweater wearer. The finished sweater includes “ease” for a casual fit. The measurements of the finished sweaters are 32 (36, 40.5, 44, 49.5, 53, 56)”. Additionally, this sweater is a straight fit (with no shaping), therefore the bust and hip measurements are the same. For a good fit, you should choose the size that fits whichever measurement is greater – either your bust or your hips.

Pattern + links to 5-part instructional videos $8 US via PayPal

And the video:


Information on things you’ll see in this video:

The sweater I’m wearing is my Ombre Dyed Sweater.
The ball-chain stitch markers I use are from Rycrafty.
The nail color I’m wearing is by OPI, called “Nein! Nein! Nein! OK, Fine!”
My watch ring is made by Davis.
Sorry – I don’t know the yarn I’m using in the sample. But the needles I’m using are Addi Turbos.

If you’ve made it this far in the post and you want to know the origin of the name, ask me. I’ll explain in the comments. I expect that some people have already figured it out. Yay!

Getting Good Tension

My suggestions for achieving every knitters ultimate goal – smooth, even stitches. If you’re a tight knitter, this video may also help you.

Links to things you’ll see in this video:
The sweater I’m wearing is my Ombre Dyed Sweater (pattern and video tutorial).

The sweater on the mannequin is a new pattern and video tutorial, coming soon!

The silky purple project bag on the table is by dellaQ Knitting Bags and Cases.

World’s Best Kitchen Scrubbie

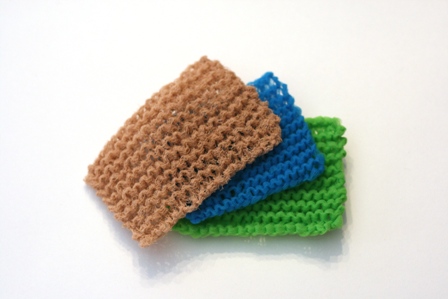
I’m happy to offer you this free pattern + video tutorial, because these scrubbies feel like a secret I’ve been keeping for years. I say “World’s Best” because I believe it – this is what you’ll find at my kitchen sink! They get the job done, rinse easily, and dry quickly – meaning they never stink. To make these, we knit with tulle fabric (also called mesh or netting), cut into strips. It’s a fun project, to boot.

This pattern is a FREE RAVELRY DOWNLOAD, and includes a link to a free video tutorial (video is also available at the bottom of this post).

Size: 3” x 4”
Needles: Size 10.5 US, straights or circulars
Yarn: No yarn! We use tulle fabric (also called mesh fabric or netting fabric), cut into strips. I cut the strips from 1” to 2” wide. (In the photo above, the tan one was knit with 1” wide strips, the other two were knit with 2” wide strips.) You will need about 12 yards of cut strips per scrubbie.
Additional Materials: tapestry needle for weaving in ends
Gauge: Gauge doesn’t really matter. To get the size above, my gauge was 4.5 stitches per inch.

Note: Do not buy sparkly, glittery fabric. Unless you like vacuuming sparkles off of every surface of your home and pets. Speaking from experience here!

Be sure to check out my other video tutorials.

And the video –

Links to things you’ll see in this video:

The pink scarf I’m wearing can be found here.
(I don’t have a Ravelry page for this project – I believe I used Malabrigo lace yarn.)

The sweater on the mannequin is loosely based on this pattern.
(Again, sorry – I don’t remember the yarn I used for this.)

The needles I’m using are Crystal Palace wood DPNs.

“Garter Tab” or Lace Shawl Beginning

The pattern for the fuchsia lace shawl can be found here.
(I don’t have a Ravelry page for this project – I believe I used Malabrigo lace yarn.)

The pattern for the green scarf on the mannequin.

My Ravelry project page for the green scarf (includes yarn info).

The bulky blue yarn I’m using to demonstrate is Knit Picks Swish Bulky.

The double-pointed needles I’m using are Crystal Palace wood needles.

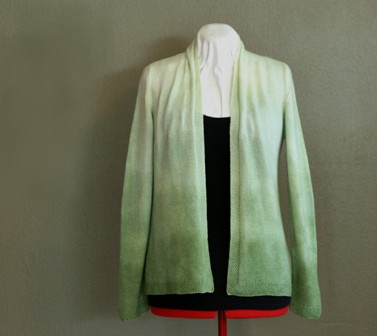
Ombré-Dyed Sweater

I’m so excited about this sweater! I want it to get cold in Texas so I can wear it now!

In this two-part tutorial, we’re going to learn how to do something very unique. We’re going to knit this sweater using undyed yarn, then dye it (as a completed garment) to get the Ombré effect. Ombré dyeing gives us a very light color at the top of the sweater, gradually getting darker toward the bottom.

There are two videos to accompany this pattern. In the first video, we talk about making the sweater itself. In the second video, we go on location with my friend Doug Upchurch, at his White Bear Fibers dyeing studio, where he shows us how to do the dyeing. (Both videos are at the bottom of this post.)

I love the look of this sweater. Not only is the dyeing a fun project on its own, but it gives us an effect you can only get when you dye the finished sweater.

In the dyeing video, we use acid dyes, but any dye that works with yarn will do. Here are three tutorials for using different kitchen-safe dyes: Kool-Aid , Food Coloring, Wilton’s Icing Gel.


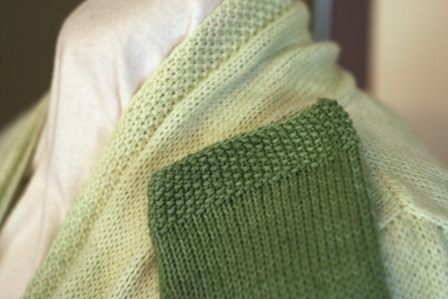
Detail of the lightest part of the sweater (the neckline) next to the darkest (the sleeve cuff).

This is knit with sock yarn for a lightweight sweater with a nice drape. The style of the sweater is simple, to really show off the color gradation as the “thing”, or the prominent design feature.

You can, of course, make this sweater using sock-weight yarn that is already dyed. (I’m pretty excited to see what you knitters do with this.) The pattern is sized from XS to 3XL.

Sizes: XSmall, Small, Medium, Large, XLarge, 2XLarge, 3XLarge [to fit actual chest measurements of 28” (32”, 36”, 40”, 44”, 48”, 52”)]
Needles: Size 6 US circular or straight needles
Yarn: Knit Picks Bare Stroll Fingering Sock Yarn, 462 yards/hank, 3 (3, 3, 4, 4, 5, 5) hanks
Additional Materials: stitch marker, tapestry needle, row counter
Gauge: 5.5 stitches and 7.5 rows per inch in stockinette. (Stitch gauge is very important, row gauge is less important. Base your needle size on stitch gauge if you’re having difficulty matching both.) Be sure to measure gauge after you’ve washed and blocked your swatch.

Note on Sizing – The measurements above are for the actual chest measurement of the sweater wearer. The finished sweater includes “ease” for a casual fit. The measurements of the finished sweaters are 32 (36.5, 41, 45, 49.5, 54, 58.5)”.

Pattern + links to 4-part instructional videos $8 US via PayPal

Video Part 1 – Making the Sweater:

Video Part 2 – Dyeing the Sweater:

Casting-On Many Stitches

Links to things you’ll see in the video:

The Ravelry page for the pink shawl I’m wearing.

My personal Ravelry page for that shawl (includes yarn details).

The Ravelry page for the green scarf on the mannequin.

My personal Ravelry page for that scarf (includes yarn details).

The stitch markers I’m using are from Darn It! Sew What? Etsy page.

The needles I’m using are Addi Turbos (widely available)

The yarn I’m using is Malabrigo Worsted, color Deja Vu