When I describe myself as a knitter, I always use the word “stashless”. This is true – I never, ever buy yarn unless I plan to cast-on with it right away, knowing exactly what I’m going to make. I have ZERO stash.
That doesn’t mean that I don’t have a “yarn closet” full of yarn. Oh, boy. I have little bits of leftover yarns from decades of projects. I’m able to use up some of these leftovers in the sample bits I knit up for demonstration in the videos, but I love it when I can sink my teeth into a great use of leftover yarns.
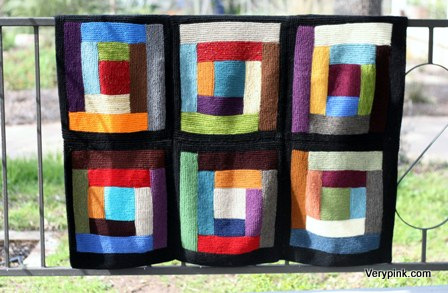
So here we have the Log Cabin Scrap Blanket. Log Cabin is a traditional quilting technique that has been adapted over the years into both knitting and crochet. This one is knit.
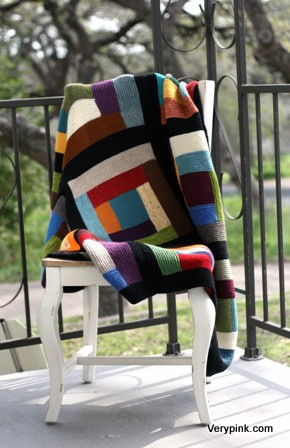
This pattern is a FREE RAVELRY DOWNLOAD, and includes links to a six-part video tutorial. The video is also at the bottom of this post.
Size: approx 47” by 63”
Needles: size 7 US (4.5mm), circulars or straights
Yarn: Use up your leftover worsted yarn bits! For best results, stick with one fiber type for the whole blanket. Either animal (wool, alpaca, angora, etc.); cellulose (cotton, linen, bamboo, etc.); or acrylic. You’ll also want to stick with one weight of yarn. If you choose to pick a border color as I did (in black), you’ll need an additional 1100 yards of yarn for the size I indicate above.
Additional Materials: tapestry needle for weaving in ends and seaming, and clippie markers are always helpful
Gauge: 5 stitches per inch in garter stitch
Frequently Asked Questions on this pattern can be found here.
Be sure to check out my other video tutorials.

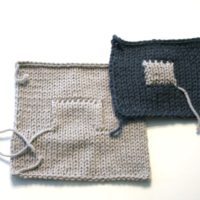

Alissa – you’ll still want to follow the pattern as written, even if you’re not changing color. (The borders are worked the same way without changing colors.) The loop from the previous strip and the k2tog create a smooth transition from one strip to the next, even if you’re continuing with the same color.
S t a c i
Thanks very much Staci! One more question for you – do you slip the first knit stitch of each row or just knit every stitch? Thanks again for your help! I’m doing this in Patons Classic Wool (I already have a few balls worth of scraps so will pick up additional balls to finish it).
OK Staci, thanks so much for your help! It is very much appreciated 🙂
Love it and have been knitting it since I found the pattern. Lots of stash left and I have 6 blocks done. I’ve adjusted so that I’m making it 4 blocks by 4 blocks but leaving the option of 4 x 5 so that it will be more bed size. Thanks for the pattern!
Will a beginner knitter be able to do this? I have made hats and scarves this year – sweaters, afghans, 30 years ago – can I do it??? Or is it on an Intermediate to Skilled level?
Thanx! BC
Bev – take a look at the pattern to get a better idea. I’d say this is can be knit by a beginner, with the help of the videos.
S t a c i
Does this need to be knit in worsted weight yarn, or can you use bulky yarn? I use mainly Lion Brand Homespun for prayer shawls, baby blankets, and the occasional hat, so I have tons of leftovers and need something to do with them. The part that concerns me is the texture of the Homespun – would that work out okay?
I’m also wondering if, when knitting the borders, I could knit the entire 10 ridges between blocks, seam it to the next block, and so on, THEN pick up & knit the entire 10 ridges below the first row for all the blocks together. Sort of like, in quilting, where you sew the blocks in rows, then sew the rows together. Would that work?
Please take a look at my Log Cabin Frequently Asked Questions page for more information on your question re: yarn weight:
https://verypink.com/2012/06/10/log-cabin-blanket-faq/
Regarding your question on borders and seaming – you can certainly do it that way. I explain it the way I do so that the seams are evenly spaced between the blocks.
S t a c i
I just want to say “I am SO EXCITED about doing this blanket. Thank you for inspiring me to get started with knitting again. I am a beginner and know that I will have no trouble doing this pattern especially after watching you video.”
I will keep you posted and maybe send you a photo of the finished blanket.
Can a combination of wool and wool/acrylic blend be used together?
You can use any yarn for this, as long as you’re consistent throughout the whole blanket. Please see my Log Cabin Frequently Asked Questions page for more info:
https://verypink.com/2012/06/10/log-cabin-blanket-faq/
S t a c i
Hey Staci, it’s me again…I am on strip 6 and the BO side is on the same side I started so I can’t turn 1/4 and start where I am supposed to…should I just do a regular BO and then just pick up from the correct place (the other side of the strip)…what did I do to have made that happen, everything was going along just fine 🙁 I’ll rip it out if you want me to! Thanks!
Gena – it’s important to BO on the right side (not wrong side) of your work. I recommend ripping it back and making it right, so that your blocks are all the same size, so they will seam up properly.
S t a c i
OK, but I can’t figure out how that happened…all of the others have been right
Hallo Stacy, thank you very much for your generosity. I am an Italian artist and mainly play with colours: normally I do not like complicate stitches, but this blanket of yours is really fascinating. I’ll try to follow your suggestions and make my afgans with the many, many yarns I have been buying in the last years. Again thank you, Lavinia from Florence, Italy.
you say to use animal fiber yarn I do not know what that is what are some of the brand names of yarn that is please help me cuz i would really like to try and make that blank thank you
Hi Betty – there are countless yarn companies and yarns that make yarn from animal fibers. I’m not sure what’s available where you live, but one good suggestion for yarn that is widely available in the US is Lion Brand Wool Ease. It is a nice, washable, and inexpensive wool blend. Hope that helps!
S t a c i
Hi staci. Sorry its me again thank you for for getting back to me that fast. Got the yarn today. Well any ways I have something else to ask you. lol I was wondering can you use any kinda of needles to do that in? Cuz i watched you in that video. and the needles you was useing I have a hard time useing those kinda of needles. Also wanted to say I love your videos It helps me alot. I am the kinda of person that has to see how it is done. Not good at reading on how to do it. well thank you again betty
Lovely pattern and a great idea, but I just don’t know if I can trust a knitter who doesn’t have a stash. 🙂
I was wondering can you use any kinda of needles to do that in? Cuz i watched you in that video. and the needles you was useing I have a hard time useing those kinda of needles. Also wanted to say I love your videos It helps me alot. I am the kinda of person that has to see how it is done. Not good at reading on how to do it. well thank you again betty
Betty – you can use circular or straight needles for this project, whichever you prefer.
S t a c i
Hi Staci. I have never knit before, saw your pattern for this blanket online and it inspired me to learn to knit! So I went to my library and checked out some books, watched your video tutorials and 2 weeks later have just finished my first block!! Thank you so much for your expertise. You are a great teacher!
I do have a question though – I have just BO my last strip (8). Your instructions say to break the yarn and weave the end to secure it. Does that mean I pull my yarn through that last loop to make the loop tight? How do I then start with my border? With each previous strip we had a loop to continue with. I am a beginner so maybe my question is silly but I watched tour tutorials and I didn’t see a part that showed the beginning of knitting the borders. It went from the finished block to showing us a block with borders already started. Any help would be greatly appreciated!
Thanks again!
Natalia
Natalia – great job! You’re well on your way!
Regarding your question – please look at the pattern carefully. “Break the yarn, and weave the end through the last loop to secure it – but DO NOT WEAVE THIS END IN. We will be picking up this last loop again to do the border rows.” So you can secure this end temporarily, but you will be loosening that loop again when you start the border strips.
Good luck!
S t a c i
Hi Staci, love this blanket 🙂 Might add this to my must knits pile 🙂 Thank you.
This was so easy and a lot of fun!
I do recommend wool though.
Hi Staci
Beautiful blanket, I would like to give it a try. Can you please tell me if the size of the needle in the US is equivalent to the size in the UK. Thank you
Pam – I’ve updated the blog post to also give the metric needle size. For this blanket, I used 4.5mm. If you ever have a question about needle size conversion, you can find the answer in this chart: http://www.yarnfwd.com/main/needleconv.html
S t a c i
Staci, I stumbled onto your directions and tutorials by chance, and I love this scrap blanket! Unlike you, I have stash yarn everywhere, but I have a piece going on each level of the house and 2 in the living room. I get bored and my fingers cramp, so I switch off. keeps it interesting. The tutorials are awesome!! Thanks so much!
This is great. I’m going to try it. The only thing is you say turn it counter clockwise, but you are turning it clockwise right?
Wow! what timing! Can’t wait to start this project. My mum was a quilter and for ages I have been trying to work out how to do the Log Cabin pattern. The tutorial is great and so well explained. Thank you so much.
I just finished mine. It will be a house warming gift for my son and his family. Thank you for your wonderful tutorials.
I would like to download the Log Cabin Blanket (knit) but when I try my computer comes back and says ” This type of file can harm your computer. Do you want to keep Log Cabin Blanket.” As I just had many problems with my computer and it is now fixed I am fearful to download this pattern. Is there any other way that I would be able to get it?
It is beautiful and I am looking forward to using lots of left over yarn to make many of them.
Please help
Diane – whether or not you can download PDF files is due to the way you have it setup on your own computer. The file download for this pattern is safe. You can trust the download.
Hope that helps!
S t a c i
Hi I just want know if this pattern is real real easy
Hi Staci! Is it ok if I use U.S size 8 needles for this project? Thanks!
Walker – you can use any needle size/yarn weight you like for this pattern, as long as you like the fabric you’re creating. The pattern will work, without alterations.
If you’re asking if a size 8 needle will result in the same size blanket as I’ve listed in the pattern – I can’t answer that. That all depends on your personal tension (or gauge, or stitches per inch). I list the recommended gauge in the pattern to get the results I got. If your tension is a little tighter than mine, it’s possible that a size 8 needle will get you the exact same as the pattern. If your tension is looser, you could end up with a much bigger blanket. You can check your stitches per inch to see what you’ll end up with when the blanket is finished.
Good luck!
S t a c i
Hi Stacy…I love love love your website and especially this pattern..I am a very new knitter… so far I have only made two scarfs…I started out making a practice square and it turned out not bad for a beginner…my question is .. I made my square w/size ten needles…when I went back to review your notes i noticed that you recommended size 7…using the smaller needles will that give me a smaller square…thank you..Pennie
Pennie – yes, larger needles will most likely give you a larger square (unless you are a very tight knitter). If you are happy with your square, you can continue to make the rest of the blanket using the same size needles. Your blanket will be bigger than I’ve listed in the pattern, but still a perfectly-functional blanket.
S t a c i
How do i knit straight edges for border
Hi Staci! I have finished all of my blocks and have steamed them. I just started the border colour on my first square and I am wondering if I still need the extra stitch on the first row of each border rectangle (the stitch that gets knitted together with another on row 2). Do I only need to do this when I am switching colours, or always, even when using the same colour? I am worried that if I keep the additional stitch, then pick up my stitches, I might forget to knit the stitches together on the next row because they are the same colour. Sorry for the confusing question – hopefully it makes sense. Thanks – Alissa
Hi Alyssa – yes, that makes sense. 🙂 And yes – you do want to continue with that extra stitch, even in the border. It helps with a smooth transition from strip to strip, regardless of whether you’re changing colors or not.
S t a c i
Thanks Staci! One more question – do you steam the blocks once more after you knit the border on each of them? I just finished my first one with a border and it doesn’t look exactly square anymore. thanks – Alissa
Yes, it’s a good idea to steam block after the borders, before seaming.
Hello, thank you for posting this pattern. In really love it. I am considered a young knitter (14 years old 🙂 ) and I found it very easy to make. I’ve only been knitting for 5 years as a self taught girl. I was able to make the square in 1 TV episode and most other panels between 1-3 episodes. I’m kinda of a slow knitter XD but really thank you for making this tutorial
Can we please get this in PDF format so we can print them?
Thanks!
PS Maybe this feature is available and I am just not aware, please let me know?
Hi Trudie – yes, this pattern is a free PDF download. You can get your copy by clicking the words in all caps “FREE RAVELRY DOWNLOAD”, or by going to this Ravelry page:
http://www.ravelry.com/patterns/library/learn-to-knit-a-log-cabin-blanket
S t a c i
Love this pattern. But have attempted to start it 3 times. I knit the first 20 ridges in the center square but when I bind off my tail and bind off loop end on opposite ends ( one on the left and one on the right) what am I doing wrong? Please give some assistance
Lynn – before you start the BO, make sure that you’re binding-off on the right-side of the work. If that means placing a clippie marker or a safety pin on the right-side of the work so you can tell one from the other, do it. I explain how to tell the difference in the video. If you used the long-tail cast-on (and not a knitted CO), your cast-on tail end will be hanging from the lower-left corner of your work when the right-side is facing you.
S t a c i
I do a long tail cast on. Should I be counting my cast on as a row knitted ( I’m new to knitting and go by rows). What I have been attempting is i cast on then knit 40 rows but still bind off loop ends up at the opposite end.
Lynn – it is better to count ridges instead of rows. Your long-tail CO is actually one half of a ridge, and your first row is the second half. So that is 1 ridge. Then your 2nd and 3rd rows create the second ridge.
S t a c i