When I describe myself as a knitter, I always use the word “stashless”. This is true – I never, ever buy yarn unless I plan to cast-on with it right away, knowing exactly what I’m going to make. I have ZERO stash.
That doesn’t mean that I don’t have a “yarn closet” full of yarn. Oh, boy. I have little bits of leftover yarns from decades of projects. I’m able to use up some of these leftovers in the sample bits I knit up for demonstration in the videos, but I love it when I can sink my teeth into a great use of leftover yarns.
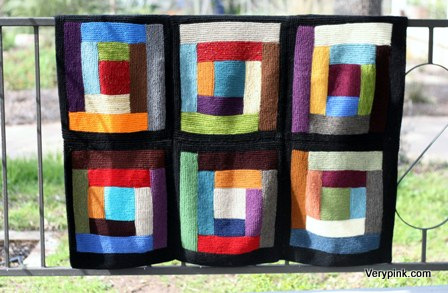
So here we have the Log Cabin Scrap Blanket. Log Cabin is a traditional quilting technique that has been adapted over the years into both knitting and crochet. This one is knit.
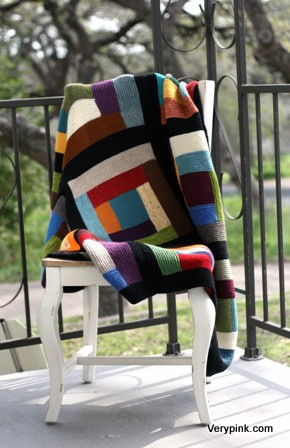
This pattern is a FREE RAVELRY DOWNLOAD, and includes links to a six-part video tutorial. The video is also at the bottom of this post.
Size: approx 47” by 63”
Needles: size 7 US (4.5mm), circulars or straights
Yarn: Use up your leftover worsted yarn bits! For best results, stick with one fiber type for the whole blanket. Either animal (wool, alpaca, angora, etc.); cellulose (cotton, linen, bamboo, etc.); or acrylic. You’ll also want to stick with one weight of yarn. If you choose to pick a border color as I did (in black), you’ll need an additional 1100 yards of yarn for the size I indicate above.
Additional Materials: tapestry needle for weaving in ends and seaming, and clippie markers are always helpful
Gauge: 5 stitches per inch in garter stitch
Frequently Asked Questions on this pattern can be found here.
Be sure to check out my other video tutorials.



Stacie,
I finally got it. Was way over thinking it. I already have 2 panels done and my 17 year old has already laid claim to this afghan. Thanks so much for your fast, reliable help. I also just learned crochet. Do you crochet or do you know of any good web sites for instructions? Anyway, thanks again.
Hi Stacy!
Love your website and tutorials! You are an outstanding teacher. I´m new to knitting and I´m trying to knit the blanket. I´ve watched the video over and over and can´t figure out what I´m doing wrong. I´ve already started twice!
Thing is I knit the first square, the first strip but then the last stich ends up in the wrong side ( that is to say if I put the work in the write side the last stich faces me so I cannot start the second strip properly. Could you help me out here please? Thanks!!
Celia – it is likely that you are knitting one more row than necessary. It is best to count ridges, not rows. The cast-on counts for 1/2 of the first row, then the second row creates the first ridge.
S t a c i
Hi Staci!
I am starting to seam all of my blocks together and have a question for you. I am seaming them together in strips of three, then will seam together the strips. My quesion is, for seaming the longer strips together, should I use one long piece of yarn, or shorter pieces and break the yarn after each block? What do you recommend?
Thanks,
Alissa
Hi Alissa – that is really just a personal preference. If you find it inconvenient to stitch with a long piece of yarn, use shorter pieces. I personally use a very long piece of yarn for long seams, to avoid having more ends to weave in.
S t a c i
Great – thanks very much Staci!
Hi Staci! Thanks for your previous answer. I´m trying to knit this blanket but it is not looking very neat in the transitions. Guess I still have to practice some more. I wanted to know if you have any tutorial on how to knit stripes. I think I might turn my project into a striped blanket since this one is not going so well. Thanks!!
When I pick up stitches along the garter stitch edge I have 2 yarns on the needle & I go in behind a stitch this leaves me a fairly large hole compared to the bind off edge. Should I only have 1 yarn on the needle when I pick up? This is an amazing project really great for carry along knitting Thank you for your sharing
Hi Lois – sorry, I don’t understand your question. “Go in behind a stitch”…? I’m not sure what that means. You can try asking again, or you can watch the video again…the video demonstrates how to pick up stitches better than I can explain it in email.
S t a c i
My Dearest Niece. This blanket is beautiful! I am so proud of you. Aunt Wanda
Hi Staci, loved working on this blanket, have taken a picture and will try to send to you. Thank you so much for your tutorials they are so helpful and nothing beats actually watching something being done, you are a great teacher.
It seems I am not able to send the picture via this site. If you would like to supply me with an e-mail address I shall then be able to do that.
You can reach me at: cathy@iinet.net.au
Kind Regards,
Cathy
Hi Staci
I havent been able to see on your video where you show how to start the (black) borders around each square. Some edges are 5 ridges & some 10 according to where the square is in the blanket BUT wont it make the squares lob sided, if you get my meaning?
Have i missed seeing the instructions & know how?
Thanks
Pamela – the video explains it better than I can here in email…the outside edges of the blanket have 10 ridges, and the inside edges have 5. That is so when you seam the blanket, you’ll seem inside edge to inside edge, and 5 ridges + 5 ridges will equal 10 ridges. That will make every border, around every block 10 ridges.
S t a c i
Hi Staci
I’ve have just completed a log cabin blanket for my granddaughter (using 5 colours for the square and one for the border), it’s beautiful. Thank you so much for your easy to understand tutorials that I stumbled across on Youtube.
Hi your easy to understand- thx for the freeness of the patterns
Im not sure after the first 2 or 3 blocks which are attached to the middle logcabin square…not sure how many more sts to pickup
my hubby will copy the pattern and I will hopefully understand everything I need to know…that wasn’t included in directions on You Tube.
can u try to come up with a pattern to use different fibers of yarn in? ie: to use a wool blend and a acryilic and use them together? maybe a rug where it may not matter what is used? (so many scraps left to use up)
this is gorgeous. I saw a lady use all the same fiber yarns to make a continuous log cabin afagan…one huge huge square- she kept on going round and round with scraps (it was square shapped) I worked out…but your smaller squared log cabin is MUCH prettier. Thx Debbie from Freeport, MI. a Grama knitter and yes I sit in a rocking chair LOL a padded LOG rocker in a log cabin home we built hahha
Staci,
I happened to stumble across your youtube video in June and immediately started a blanket. I am happy to say that with your direction I started and completed this project just in time to give to my Mother-in-law for her birthday yesterday. It came out beautifully. Now I will have to do one for myself. Thanks so much for the pattern and tutorials.
Ravelry Handle: brwnsuga
Staci,
When you first made this blanket, how did you know what colors looked good next
To each other? What did you do when you could figure out what color to use next
To certain colors? I am on my 8th square of a 25squares for my log cabin blanket,
I dont know what color to use next. The colors next to it would be purple, navy blue,
Aqua green and black for the border. Please let me know how you fix these type of problems.
Clara
Hi Clara – if you take a look at my Log Cabin Frequently Asked Questions page, your question is the first question I address! You can find it here:
https://verypink.com/2012/06/10/log-cabin-blanket-faq/
Hope that helps!
S t a c i
Staci…I found your tutorial so very instructive…made me wish my knitting teacher had been half as good as you, and she too was very good. I was enthralled with your sewing seams technique, and your ‘magic’. Totally amazing. I haven’t had a chance to look yet, but do you teach crochet also? I’m trying to learn this, and at age 75, the motions just aren’t natural to me like knitting is. I signed up for a very expensive ONE DAY class at JoAnne’s and paid for a class on Annie’s, but I’m just not grasping something. I watched you do some crocheting, but like all the others, the moves are just foreign to me…I hear its faster than knitting and would still like to learn how and learn to feel comfortable with the process. Yes, it took me a while to feel comfortable with knitting, but not this long. lol Thanks for your wonderful, generous instructions.
Hi Staci wow thank you so much just finished over 800 blocks in different sizes after watching you tutorial I know now how to sew them together. I tried your log cabin but I casted on with needles it didn’t work so well now I have to learn your cast on anyway that’s my mission today, will let your know how I did. Thanks Lynette 🙂
Hi Staci. I started my blanket with my scrap yarn and its turning up to be one of the most beautiful blanket i’ve knitted in years. What a great idea. Thanks
Thank you Staci. Not only is your work beautiful, but you are such an inspirational and brilliant teacher!
Hi Staci,
I leave a comment not because I have a question, but just to thank you. I explain: I’m a french mom of three who is learning knitting for a few months…. Since I was pregnant with my first child. Hopefully I undestand English, and I’ve got a tape measure with meter and inches;-) And thanks to you I understand better some techniques that I would do in french language. Actually I was looking for some crochet lessons, and I just saw your log cabin blanket video. I wanted to start a longterm project for a long time, and I finally got it. And your videos are incredibles, my knitting will be better thanks to you.
Pardon my english, but I just wanted to share the anecdote.
Now your website is in my favourites! Have a nice day,
Rorie
Hi Staci! I have finished all my squares and am knitting the borders. I decided to use a quilting technique and knitting full borders according to a schematic of the squares I drew. The four corners are ten ridges around and the rest are either top and bottom or two sides, two are three sides, and three are bottom only. I hope this is doesn’t sound confusing. But it is working, and I keep the squares in order with a numbered sticky note pinned to the upper left corner of each square. I have oriented them clockwise with block #1 having the first strip on the center square on the left. I am knitting the borders from a red tweedy yarn. I have also been traditional in knitting the center square in red, as in quilting. Loving the look, thanks so much for this pattern! I am toying with the idea of knitting a back right to the joined squares, picking up stitches along the horizontal side then incorporating a new stitch from the vertical side with a knit two together. That will be a lot of stitches across, so I’m not sure I want to tackle that, but I would like a finished look to the whole thing, we’ll see!
Hi again, I was looking at some of the questions other knitters have asked and your answers. In response to one knitter you said that if you use the long-tail cast on, as I do, that on the right side of the work the tail will be on the left bottom corner. When I cast on with the long tail method, the tail is in the right bottom corner with the right side facing. The opposite is true for me if I use the knitted cast on or the cable cast on. I’m wondering if you have a different way of doing the long tail CO? I have also experimented with the crochet CO, and the tail for that ends up on the left corner. I guess there are many different COs, I have seen some complicated ones in books, I keep it simple! Thanks again!
Hi Staci,
I rarely like to leave messages on blogs but I really wanted to let you know how wonderful I thought your project was! I love it to death! I have a gallon size container full of yarn that I have no idea what to do with. I am so glad I found your website and your tutorial on how to knit this beautiful blanket. Thank you so much for posting this!!
Hi Stacy, I recently found this website while looking for a easy pattern for a dish cloth. I had just started actually knitting things recently, I made a couple of the dish cloths that you had made in one of your videos. Loved it and found the video for this on YouTube. I am almost completed my 1st block; I bought 3 different colors as I didn’t have “scrap” yarn. So far, I love the way it’s looking! I love your videos, they are really easy to understand especially for a beginner knitter. Thank you for making it possible for me to learn how to CO, I couldn’t understand the technique to it until I watched your videos. Thank you again.
Hi Stacy. Love this pattern and started a baby blanket with steel blue, steel gray, white and black. It looks very cool so far but realized in one of the strips already bound and attached, that I made mistake in a stitch. Looks like I dropped or twisted. Any way to fix that without having to undo the strip? Thanks for your help. I love your site BTW. So very clear and helpful.
Debbie – if you can undo the bind-off for that strip, you can drop down into the column of stitches and fix it using this technique:
https://verypink.com/2010/03/15/correcting-a-dropped-stitch/
Otherwise, your best bet is to rip back to correct it, or just call it a “design feature”.
🙂
S t a c i
I love this pattern! I tried one similar to it, but it was angular (all sides but the middle were “L” shaped and I just couldn’t understand the directions, no matter how hard I tried! Thanks so much for posting this and the Videos are just awesome. So Helpful!! You’re so generous to share all this. May God Bless you!
I am unable to view the video. I’ve tried several times and I keep getting message that an error has occurred, please try again later. I don’t know if it is your site or my computer. Since I see a comment posted Dec. 28, 2013 I’m thinking it may be my problem. What are the video requirements to view the tutorial? The blanket looks like it would be perfect for a young guy’s room. Classy but not frilly.
Kay – the videos are running fine…you may need to refresh your browser. If you’re still having trouble viewing the videos, I’ll bet that you’re unable to view any YouTube videos, which may mean that you’re missing a plugin. (Your browser should automatically alert you to this. If it doesn’t, you might want to visit the YouTube help section.)
Here is a link to watch the video directly on YouTube (and off my website), see if this helps:
http://youtu.be/IeAFAuqTkl4
S t a c i
Merhabalar Staci,
Log Cabin Scrap Blanket projenizi çok be?endim… Çok te?ekkür ediyorum.
Sitenizi ve videolar?n?z? ilgiyle ve be?enerek takip ediyorum. Çok ba?ar?l? buluyorum. Sizi tebrik ediyorum. Ba?ar?lar?n?z?n devam?n? diliyorum.
Sevgiler, selamlar… Thank you very much…
Müjgan
Üsküdar/?stanbul
Staci,
You used black as your boarder in the video but then you said if you would have know it was going to be hard to see and switched it to a brown color. Well what about using a light or white for the boarder? I did all my center squares in white and I was thinking of a white board too. What is your opinion about that? Cause I used some dark colors on strips 5 to 8 on a few squares and they wouldn’t show up as good. OR could you use any color for the boarder?
Can’t wait to hear from you,
Clara Hanson
Clara – lighter border colors are easier to see while seaming. The second blanket I did was in brown, and being able to see what I was doing while seaming was easier than it was with black!
S t a c i
thank you so much for the pattern- it’s fabulous, have been making my blocks but am stuck on the borders- i’ve watched the video what feels like a million times and simply don’t get it- the printed pattern tells me the info for the borders is found on the video but i am stuck- i am really not a great knitter and don’t have a creative gene in my body so that combo is making understanding what to do once i’ve completed the block nearly impossible- can you please give me some direction, sorry to be SO DUMB!thanks again for the pattern, adrienne
Adrienne – the borders are worked like any other strip, the only difference is you don’t change color when you change sides. Take a look at my Log Cabin Frequently Asked Questions page, which will answer most questions you might have (including this one): https://verypink.com/2012/06/10/log-cabin-blanket-faq/
Good luck!
S t a c i
I’m hooked and ready to start. I have used up all my yarn so would like to know if you have a wool favorite brand. Soft is important. I will be buying enough for a queen bed and figure maybe 9 or more different colors. Please advise. I love your website and utubes.
I am ready to put all of my blocks together. But I want to be sure that I am working with “Right” sides when I bind them together. Correct?
Thank you for the GREAT tutorial!
Melissa – the video shows it better than I can explain it here…you want the right sides of the work facing you as you work the mattress stitch, so that the “ridge” the seam creates is on the back of the work.
S t a c i
Due giorni fa ho terminato la mia coperta, che per me è davvero bellissima!
Grazie per aver condiviso questo video che, al di là della lingua, è fatto così bene, che mi ha permesso di realizzare il mio primo lavoro con la tecnica del log cabin, tecnica che mi ha conquistata e che non abbandonero’!
Roberta