Click here to get your free copy of the pattern!
IMPORTANT NOTE: The pattern designer has updated and changed the pattern since I released the video tutorial in 2013. The construction and the techniques used are the same, but the row-by-row instructions I use in the video are different than written in the updated pattern. Please follow the pattern for row-by-row instructions.
This pattern is designed by Frankie (Rosemily on Ravelry). You can see her other designs here.
To learn more about Frankie’s work with the Children’s Liver Disease Foundation and to donate, visit her website.
Many thanks to Frankie for the great pattern!
To see thousands of examples of this finished blanket by other knitters, visit the Ravelry project page.
Links to the different video parts
Part 1: Intro
Part 2: Mitered Corners
Part 3: Picking up stitches on the flat sides
Part 4: Using markers to keep careful count
Part 5: Finishing
Information on things you’ll see in this video:
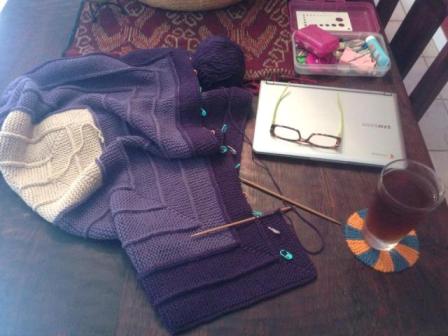
The yarn I used in my finished blanket is Berroco Vintage, in colors: cream – 5104, purple – 5155, and petunia – 51105. I bought three hanks of each (but only used 2 of the cream), using size 7 US (4.5mm) needles. After machine washing and drying, my blanket is 40″ square, with a gauge of 4.5 stitches per inch.
The bulky yarn I used for demonstration is Lion Brand Hometown USA. I demonstrated using size 13 US (9mm) needles.
Clippie markers like the ones I use can be found here.
The sweater on the mannequin is my Ombre Dyed Sweater, pattern and video tutorial.
To change color with a clean color break, start your new color in the first row of a mitered corner. Instead of slipping the last stitch in the first row of the mitered corner, knit all the way across. Then work the rest of the corner as written.
To bind-off at the end of this project, BO normally (knit-wise) on the wrong side of the work.

I love this blanket!!!!! So AWESOME!! I cant wait to knit it! 🙂
So many thanks for doing this tutorial. This blanket pattern has been on my to-do list for a long time but I was unable to figure out the “start”. You have solved my problem. I’m most appreciative.
Thanks for the tutorial, I’m 99% comfortable with the pattern just a little shaky on the color change. I’ll watch the video again and make sure I’m understanding.
This will be my next blanket to knit after I finish my Texas Flag baby blanket. Is there a way you can post links for the different sections of the video? I know on your purchased patterns your have them. It would be nice to jump to the video section that I need to view again (and again…and again)
Yes – thank you, Peggy. I meant to do that sooner, but I’ve done it now!
S t a c i
Thank you again Staci!
Stac, making the corners is easy. But I end up with a hole in the middle of my work. What am I doing wrong? I don’t think I can leave a photo. I’m going to try to past the flickr link to the photo. I left it on a thread in your Rav group. Sorry if it was the wrong place.
Sorry about the typo in your name. Guess it wouldn’t let me leave the flickr picture.
Susan – it looks to me like you’re picking up all of the stitches that join in the center of the two mitered corner all in the same stitch, and you’ve stretched that stitch out. A bit of a tighter gauge (either smaller needles and/or bigger yarn) and spreading those picked-up stitches out a little bit should fix it.
S t a c i
Thanks Staci. I know I made mistakes picking up. But even before then I think the problem was that I was not bringing the yarn between the stitches on the even number rows where you had to YB after the SL1 PWISE stitch on the 1st row. So It left a space or gap. I’ve now put darker colored lifelines after each of the first two corners just for reference points. This is what happened to me before when I first tried this. Also, after the 1st two corners I knitted 2 rows before I did the next 2 corners (in the beginning where it’s the only time we’ll do two 2 corners. Will take a photo and post it on the Rav group.
Hi Staci, thank you so much for doing this fantastic video tutorial. I have just one question for you: Frankie writes **Work one ridge with all 10 sts then turn another corner from * to **. Did you do the extra 10-stitch ridge after row 16 of the second part of the mitred corner? I can’t remember it in your video. You help is much appreciated, as always.
Sandra – I don’t think I show that in the video, but I mention it. it’s always best to follow the pattern, row by row, and use the videos as a guide for techniques.
S t a c i
Thank you so much for the tutorial and especially your version with the pick up part, I love the effect, and I have also used this variation on the 10-stitch twist blanket pattern, looks amazing!
I am such a huge fan of you here in Holland. Thank you again for all your help and ideas at your website.
Could you think about doing a video on swiss darning? I think it would be great thing to learn.
I will check that out, Jennifer. Thank you for the suggestion!
S t a c i
I’m just a bit confused about exactly where and how you change colors. I’ve got lots of small balls of yarn and wanted to “practice” mitered corners as well before investing in yarn. Would it be possible to show that specific technique?
Hi Betty – here are the exact instructions for working a color change. You want to change color? in Row 1 of the first half of the mitered corner. Instead of “Sl 1, K8, yfwd,? Sl 1, yb, turn” you want to “Sl 1, K9, turn”, working that row in the new color.
S t a c i
If you wish for to improve your know-how simply keep visiting this site and be
updated with the latest information posted here.
I am amazed at that 10 stitch blanket. Unable to download it from Ravelry. Your videos are marvelous and very helpful. I am fascinated with the sweater. Been knitting for years but never seen one knitted that way. Am anxious to try it. Thanks for sharing,Staci.
Hi Yvonne – thank you for the note. I’m not sure why you’re having trouble downloading the pattern off Ravelry – I just tried it, and it worked fine. Might want to try again, and/or use a different browser.
S t a c i
Thanks Staci-I got it.
Hi Stacy
I love the way you demenstrate this blank it took me awhile to figure out
how the corners work but I’ve got it down packed. I will use this as one
of my practice patterns before I work a whole banket. So I will know how
to make it the right way. I have one suggestion for you that might also
help. On the first square after the first two corners are made.To start
the blanket. When you start working the nine rows after placing the first
marker on the starting row. How about placing a marker to tell where the
next corner will be made so people won’t get lost after the nineth rows. I
came across that idea myself after watching your video.I’ve tried it that
way and it helps to verify where the next corner should be. I think you
did a great job on this video and making this project steps very clear and
easy to follow along with.
Freda
I have been looking for four years for this exact video instruction. Thank you so much for sharing. I can FINALLY get started on the mitered corner blanket I’ve been on hold for — as a just barely intermediate knitter, sometimes the instructions for slip/wrap/yo combinations just isn’t enough. And, if a picture’s worth a thousand words, a video is, well, the ultimate! thank you Staci.
Have started this blanket. I am using superwash hand dyed worsted weight yarn in varigated jewel colors. It’s really beautiful. I am also using your idea to get the knit stitch ridge on the right side. Everyone who sees it loves it, and I have recommended your site because I really enjoy your videos and find them very helpful. Thanks
thank you so much for the video tutorial, it’s a great tool for begginner like me, i’m working on the 10 stiches blancket and i love it…I also did your double moss stiches hat and alot of mitts. My next project I think it will be your men sweater.which is knit in round cant wait. thanks again for this website, your very describtive and it help alot.
Hi Staci! I’m pretty new to knitting and your videos are always super helpful. I think I’m confusing myself in the very beginning. When you slip the stitches to start the ridges do you slip purlwise with the yarn in front or in back? Thanks for your help!
Jillian – since you’re knitting every stitch, you want to keep the yarn in back. Slipping “as if to purl” just means that you’re sliding the stitch from the left needle to the right, without twisting it. In this pattern, you’ll do that with the working yarn in back.
S t a c i
I don’t know how many times I pulled my single point needles out when turning my work before I saw your video. Their ends kept snagging in my shawl. (It’s cold in the Great Pacific Northwest right now.)
There were a few other minor points I was confused about. My joins now look they were made by a Kindergarten craft show Honorable Mention not the preschool craft show also ran, but I’ll pass them off as a design feature or embellish over them. (I was knitting the join stitch after the psso instead of just turning the work.)
Staci,
I have been knitting for many years, but you always show me new ways to do things! Thank you! I have a question about this gorgeous blanket. I want to make it rectangular in shape so that I can make it for an older child. You briefly mentioned that could be done, but I’m not quite sure how. Would you try to explain that again?
Thank you for all of your lessons
Elyse
Elyse – just start with a longer initial strip…that is what sets the proportions for the rest of the blanket!
S t a c i
Will that change the ten stitches that are supposed to be on the needle? I guess that’s my confusion.
Thanks, Staci!
No, cast-on the same number…just start with a longer first strip.
S t a c i
Hi Stacy,
my question is that at the end how was teh border done on the blanket, i mean did you just follow the pattern and bind-off at the end or you did a separate border. How will i end upp getting a curved edge on each corner if i follow the pattern. Please let me know!
thanks
Wardah – just follow the pattern! No separate border. The way the blanket works up creates a nice edge that works well for a blanket border.
S t a c i
Hi Staci I have been knitting for a long time but in the short while I have been watching your videos I have learnt so many new techniques to speed up or make my work look so much better – keep up the amazing work and THANK YOU from here in England x
Polly
Would a long-tail cast on be a suitable start for this project, and if yes, would I still cast on then knit 17 rows?
Arlanda – the long-tail CO is the same one I used for this pattern. No need to change the pattern.
S t a c i
A thousand thank yous Staci! Was determinedly struggling with this pattern til I watched your tutorial. The written pattern does not explain that there will be stitches left on the needle when shaping the corners. The visual example does that so well. Am now happily on my way. Even though it is a very hot summer here I like to keep busy with my hands while watching telly in the cool A/C. Hope you had a great Christmas and wishing you a Bonza New Year from Australia. MM
Your tutorial is great -many thanks. I’ve been knitting the blanket for two days now and I’m assuming it’s the way I hold my needles, I have jabbed myself so many times on my left index finger that it has broken the skin, so tomorrow will have to be a knit free day! Your weather is number 1 item on New Zealand news, please all take care and keep warm!